
Platform events enable application to deliver secure, scalable, and customizable event notifications within the Salesforce platform or from external source.
In this post we will publish platform events from ASP.NET application and subscribe using Flow, Apex trigger and Lightning component.
Use Case:
Let us take example, one e-commerce application is built in ASP.NET application and when order is generated by customer. That order information should be shared by various system/module like warehouse system, shipping system, vendor/partner system, billing system and CRM system. Salesforce will subscribe that event and get all order information.
Below steps are required for this use case
- Platform Event Creation
- Connected App for ASP.NET
- Setup user and permission set
- Publish Event form ASP.NET
- Subscribe Event in Apex Trigger
- Subscribe Event in Lightning Component
- Subscribe Event in Visual Flow
1. Platform Event Creation
Platform Event is similar to salesforce object and we can create like a custom object. Platform Event are created with __e suffix. e is stands for events.
We have to create fields like custom fields in standard or custom object. These fields are used to hold event message which will be transferred using event bus.
To create platform event in org, go to Setup->Platform Event
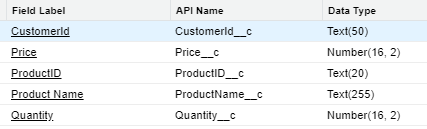
For above use case, create platform event named ‘ProductEvent’. We need following fields in Platform Event. So create these fields as mentioned in below image or based on your use case.
2. Connected App for ASP.NET
Create connected app for ASP.NET. A connected app is a framework that enables an external application like ASP.NET, Java etc. to integrate with Salesforce using APIs and standard protocols.
Create connected app from Setup->App->App Manager-> New Connected App
Create connected app with below access.
| Application Permissions: | Perform requests on your behalf at any time | ||
| Full access | |||
| Provide access to your data via the Web | |||
| Access and manage your data | |||
| Callback URL | https://localhost:44378/product |
Refer Connected Apps
3. Setup user and permission set
Create a user, permission set and profile for external system. Provide minimum access to user. Use permission set to give permission. Profile should not have any permission.
This user with connected app will be used by ASP.NET application.
4. Publish Event form ASP.NET
E-Commerce application will be created in ASP.NET. This application will fetch product information from Salesforce object product. For demo purpose, I have created only two pages. One page for showing complete product list and second page to buy that product. We are only publishing product event platform event from checkout page.
We have to create two custom object (can use standard object also) Product and Product Order.
Product custom object fields
| Field Name | API Name | Type |
| Discount | Discount__c | Currency(2, 0) |
| Image | Image__c | Text(255) |
| Is Stock Available | IsStockAvailable__c | Checkbox |
| Product Description | Product_Descriptiom__c | Text(255) |
| Product Name | Name | Text(80) |
| Quantity | Quantity__c | Number(18, 0) |
| Unit Price | UnitPrice__c | Currency(16, 2) |
| Vendor | Vendor__c | Lookup(Vendor) |
Product Order custom object fields
| Field Name | API Name | Type |
| Order Number | OrderNumber__c | Auto Number |
| Order Status | OrderStatus__c | Picklist- New Review Completed Dispatched Delivered |
| Product | Product__c | Lookup(Products) |
| ProductOrder Name | Name | Text(80) |
| Quantity | Quantity__c | Number(16, 2) |
We will use above created connected app and Salesforce user in this site. Below tasks are required to publish platform event.
- Login to Salesforce
- Get Product Detail from Salesforce Product Object
- Show product list on web page
- Publish Platform Event
a. Login to Salesforce
Store salesforce connected app and user detail in app.config. Below code will be used to connect Salesforce org.
 public void Login()
        {
            String jsonResponse;
            using (var client = new HttpClient())
            {
                var request = new FormUrlEncodedContent(new Dictionary<string, string>
                    {
                        {"grant_type", "password"},
                        {"client_id", ClientId},
                        {"client_secret", ClientSecret},
                        {"username", Username},
                        {"password", Password + Token}
                    }
                );
                request.Headers.Add("X-PrettyPrint", "1");
                var response = client.PostAsync(LOGIN_ENDPOINT, request).Result;
                jsonResponse = response.Content.ReadAsStringAsync().Result;
            }
            Console.WriteLine($"Response: {jsonResponse}");
            var values = JsonConvert.DeserializeObject<Dictionary<string, string>>(jsonResponse);
            AuthToken = values["access_token"];
            InstanceUrl = values["instance_url"];
        }
b. Get Product Detail from Salesforce Customer Object
Now retrieve product details with Salesforce custom object API.
public IActionResult Index()
        {
            var client = SalesforceClient.CreateClient();
            client.Login();
            var products = client.Query("Select Id,Name,UnitPrice__c, Quantity__c,IsStockAvailable__c,Image__c from Product__c where IsStockAvailable__c=true");
            var prds = JsonConvert.DeserializeObject<Models.Product>(products);
            return View(prds);
        }
c. Show product list on web page
Show product list which is retrieved from above query. This is done in View page of asp.net.
@foreach (var prd in Model.records)
{

    <div style="display: inline-block">

        <div class="card">
            <img src=@prd.Image__c alt="Denim Jeans" style="height:180px;width:auto;margin:10px">
            <h1>@prd.Name</h1>
            <p class="price">@prd.UnitPrice__c</p>
            <p><button class="button" type="button" title="Add to Cart" value="Add to Cart" onclick="location.href='@Url.Action("Product", "Home", new { id = @prd.Id,image=prd.Image__c,quantity=@prd.Quantity__c,name=prd.Name})'" >Checkout Product</button>  </p>
        </div>
    </div>
}
d. Publish Platform Event
Once product is selected, we can publish order product detail with Platform Event. This is just for demo purpose, we can put detail based on our business requirement.
public string addMessage(string id, Int32 quantity, string name, string custId)
        {
            using (var client = new HttpClient())
            {
                string restRequest = InstanceUrl + "/services/data/v49.0/sobjects/ProductEvent__e";

                //Arrange
                var pd = new Models.PlatformEvent();
                pd.Quantity__c = quantity.ToString();
                pd.ProductID__c = id;
                pd.ProductName__c = name;
                pd.CustomerId__c = "XXXX";

                var json = JsonConvert.SerializeObject(pd);
                //construct content to send
                var content = new System.Net.Http.StringContent(json, Encoding.UTF8, "application/json");

                var request = new HttpRequestMessage(HttpMethod.Post, restRequest);
                request.Headers.Add("Authorization", "Bearer " + AuthToken);
                request.Headers.Accept.Add(new MediaTypeWithQualityHeaderValue("application/json"));
                request.Content = content;

                var response = client.SendAsync(request).Result;
                var result = response.Content.ReadAsStringAsync().Result;
                return result;
            }
        }
Refer complete ASP.NET code.
5. Subscribe Event in Apex Trigger
As Platform Event will be published from ASP.NET application, we can subscribe that event in Salesforce Apex Trigger. This trigger is creating product order record based on event message detail. We can have different business logic when event notification is received.
6. Subscribe Event using Lightning Component
We can subscribe published Platform Event using lightning page. We have to create one lightning web component for this. This component will be placed on lightning app builder page. Lightning app builder page will be shown as tab.
7. Subscribe Event using Flow
We can subscribe event using flow to send email to customer. We can add any business functionality, for demo we are sending email.
- Create Email Template to send. Create one email template for Order Received.
- Create Workflow Email Alert to send email. Use above email template. For demo, create Product Order Alert.
- Create flow and use Email action to call Workflow Email Alert (Product Order Alert).
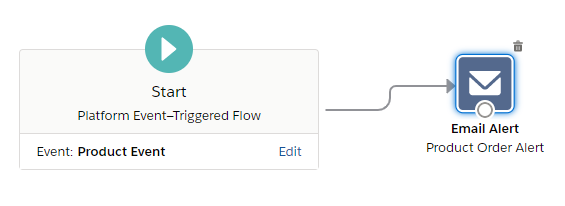
Flow Schema:
Reference:
https://trailhead.salesforce.com/modules/platform_events_basics
https://help.salesforce.com/apex/HTViewHelpDoc?id=platform_events.htm
Video Explanation:
Related Posts
- Efficient Ways to Debug Salesforce Platform Events
- Ultimate Guide to Monitoring Platform Events using Streaming Monitor
Other Posts
- Ultimate Guide to URL Accessibility in LWC
- Dynamically Instantiate Components in LWC
- Generic Notification Component in LWC
- Reusable Custom Calendar LWC using FullCalendar Js Library
- Custom Toast with custom duration In LWC
- Dynamic Interaction Between Two LWCs
- Sending Wrapper object to Apex from LWC
- HeatMap Chart In LWC
- Generate and Create Signature in LWC
- Optimizing Salesforce Apex Code
- Optimizing Loop in Apex Code
- Handle Heap Size for Apex Code Optimization
- Enhance Apex Performance with Platform Caching
- Apex Trigger Code Optimization
- Optimize Code by Disabling Debug Mod
- Optimize Apex Code by Metadata Caching
2 Comments
Execellent job.Crisp and succint!
Thank You @Chetan.
Regards
Dhanik