
Salesforce Bulk API is used primarily for data migration or data upload. Bulk API has two versions to support data upload. Bulk API V1.0 is custom REST API and V2.0 is standard REST API. Bulk API V2.0 will support all features of REST API like stateless, cacheable , simple to use and etc.
Below are some benefits of Bulk API V2.0
- Bulk API 2.0 provides a simple interface to quickly load large amounts of data into your Salesforce org and to perform bulk queries on your org data.
- Bulk API 2.0 supports all OAuth flows supported by other Salesforce REST APIs.
- Bulk API 2.0 simplifies uploading large amounts of data by breaking the data into batches automatically. All we have to do is upload a CSV file with record data and check back when the results are ready.
- Instead of limiting the amount of data uploaded daily by the quantity of jobs, Bulk API 2.0 uses a limit of total records uploaded
Difference between Bulk API V1.0 and V2.0:
Bulk API V1.0 can also process records but there is some advantage in Bulk API v2.0. Below is some important difference between Bulk API V1.0 and V2.0
| BULK API 1.0 | BULK API 2.0 |
| Batch need to create manually | No need to create batch. System will do this internally. |
| Limits on number of record, file size and batch | Based on daily limit in 24 hr hour |
| Built on custom REST framework so not like other REST API Integration | Built on standard REST API so similar to other REST API integration |
| Support serial and parallel processing | Support only parallel processing |
Let us see how we can use Bulk API V2.0 using POSTMAN. Similar to POSTMAN, we can utilize these API calls from other applications like .NET, Java, SAP etc.
For processing records in Bulk API v2.0 we need below steps
- Get Access token.
- Create bulk job
- Add batch to job
- Close job to start processing
- Get Job Status
As we need to call Salesforce using REST API, we have to create connected app. See our last post for this.
Along with connected app, we need to share user credential with client or caller. Before sharing user credential, review profile/permission set of that user. Caller should only able to use REST API of your org and only required permission should be given. This is required for securing your org.
Let us start above mentioned steps one by one
1. Get Access token
As we need to call Salesforce Org REST APIs, we need access token for that. This step will get access token from Salesforce Org so that subsequent call can use that token to create/upload bulk job.
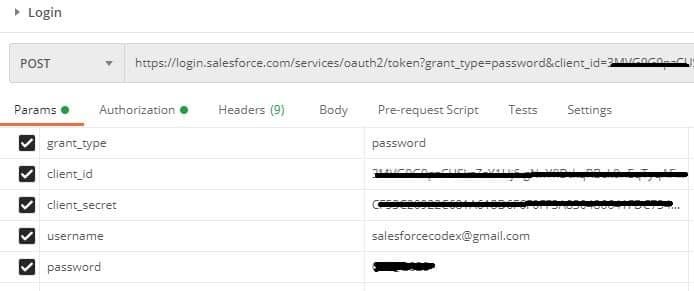
Below request detail will be sent from POSTMAN/client apps to get access token. If you use sand box then use https://test.salesforce.com For developer and production environment we will use https://login.salesforce.com.
| Request Detail | values |
| Endpoint Url | https://login.salesforce.com/services/oauth2/token |
| Http Method | POST |
| Params | |
| grant_type | Password |
| client_id | {{connected app client_id}} |
| client_secret | {{connected app client_secret}} |
| Username | {{username of salesforce}} |
| Password | {{password of saleforce user}} |
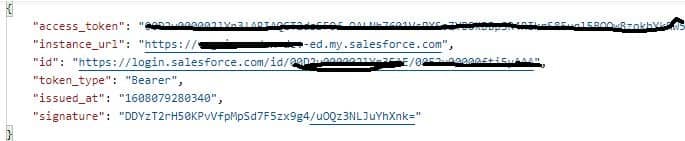
After submitting these detail to endpoint url we will get access token and salesforce org instance name. These will be used in next step to frame REST API url and headers.
2. Create Bulk Job
Once we get access token, we will able to call bulk api. For uploading records, we have to create bulk job first. As this will be REST API call, we have to provided access token which we have received in first step.
In this step, we have to provide- what kind of operation we are performing, which object will be used to upload records.
| Request Detail | values |
| Login Url | {{instanceUrl from first step response}}/services/data/v50.0/jobs/ingest/ |
| Http Method | POST |
| Headers | |
| Content-Type | application/json; charset=UTF-8 |
| Accept | application/json |
| Authorization | {{access_token from first step response}} |
| Body(raw) | { “object” : “Account”, “contentType” : “CSV”, “operation” : “insert”, “lineEnding”: “CRLF” } |
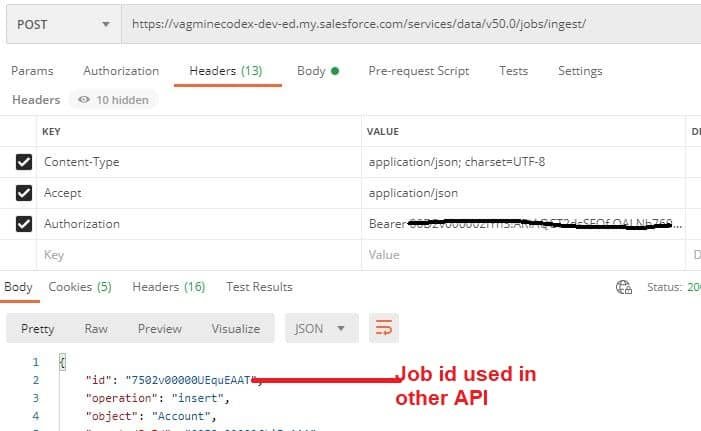
On submitting above request detail, we will get job id (indicate in above image). This job id will be required along with access token in next steps.
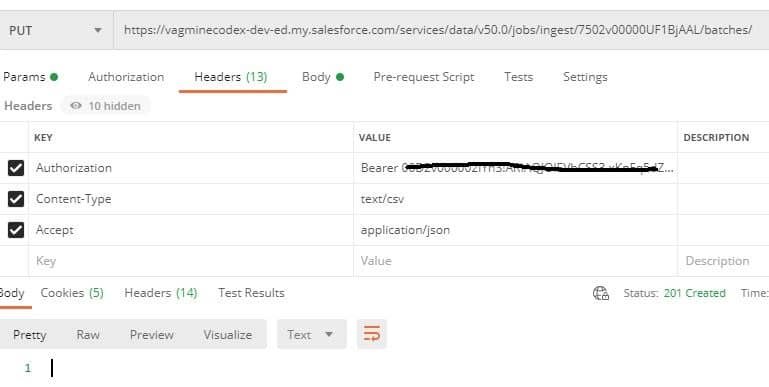
3. Add batch to job
As we are able to create job in previous step, now we have to upload record in that job to process records. Records can be uploaded in two ways, using CSV file upload and upload records directly in API request body. Use any method to upload record.
Based on uploaded record count, system automatically divide in batches. In V1.0 we have to upload multiple batches and keep track of each batch. Here in V2.0, we don’t require to create multiple batches.
| Request Detail | values |
| Login Url | {{instanceUrl from first step response}}/services/data/v50.0/jobs/ingest/{{jobid from create job step}}/batches/ |
| Http Method | PUT |
| Headers | |
| Content-Type | application/json; charset=UTF-8 |
| Accept | application/json |
| Authorization | {{access_token from first step response}} |
| Body(binary) | Select csv file to upload |
| Body(raw) | Name,FirstName__c,LastName__c,Phone,Email__cSamson,Samson,Williamson,1-741-812-6068,Cum@congueelit.net |
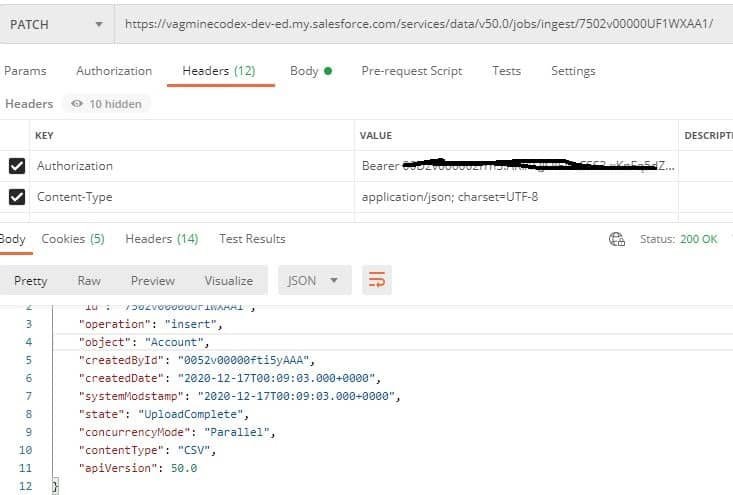
4. Close job to start processing
Once records are uploaded, we need to close job. This will indicate that system can now start processing records. Based on number of records uploaded, system will create batch internally.
| Request Detail | values |
| Login Url | {{instanceUrl from first step response}}/services/data/v50.0/jobs/ingest/{{jobid}}/ |
| Http Method | PATCH |
| Headers | |
| Content-Type | application/json; charset=UTF-8 |
| Authorization | {{access_token from first step response}} |
| Body(raw) | { “state” : “UploadComplete” } |
On submitting it will be object detail and type of operation we have performed. It will also indicate job state.
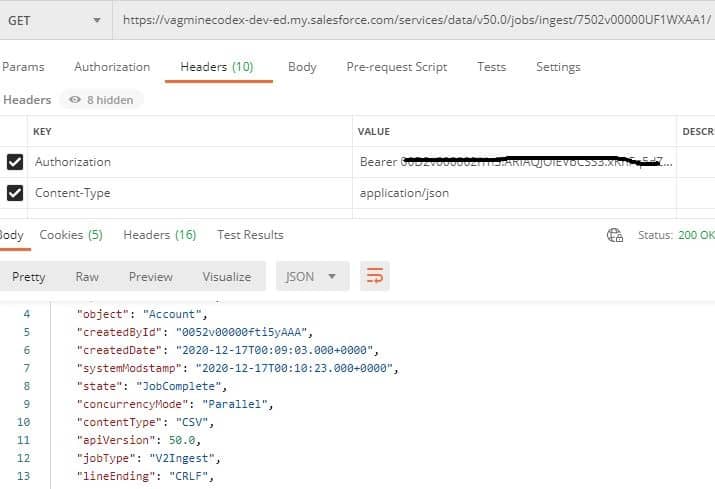
5. Get Job Status
Once job is closed and if we want to check status of record processing, we can get status using API.
| Request Detail | values |
| Login Url | {{instanceUrl from first step response}}/ /services/data/v50.0/jobs/ingest/{{jobid}}/ |
| Http Method | GET |
| Headers | |
| Content-Type | application/json; charset=UTF-8 |
| Authorization | {{access_token from first step response}} |
Above request will give current status of job. In below image, it is showing status as JobComplete.
References:
https://developer.salesforce.com/docs/atlas.en-us.api_bulk_v2.meta/api_bulk_v2/