
Text translation is converting text from one language into another while preserving its meaning and context. It allows individuals and businesses to bridge language barriers, communicate effectively across cultures, and access information in different languages.
Text translation can be performed manually by proficient bilingual individuals or by utilizing automated translation tools and technologies. Automated translation tools often employ machine translation algorithms, which use statistical models or artificial intelligence to generate translations. Some popular text translation services and tools include Google Translate, Microsoft Translator, DeepL, SysTran API, and many others. This post will use SysTran API to translate the text with a low-code approach.
Read More: The Ultimate List of Salesforce Integration Resources
About Systran Translation API
SysTran Translation API is used to perform translations. It is a tool that automatically translates text from one language to another. Systran is the first company to offer machine translation for commercial purposes. This API provides a translation of text and files as well.
Few Systran API endpoints:
- https://api-translate.systran.net/translation/text/translate
- https://api-translate.systran.net/translation/file/translate
The first API translate the given text into the required language and the second API will translate the complete uploaded document. There are other many APIs available to get the status and create a batch to translate many documents in one go. You can check all API documents in their API documentation. As part of this post, I have used the first API.
Business Use Case
Text Translation has many use cases. It can be used in obtaining fast and reliable translated content. Below are some Important use cases where this can be used.
- Internal emails and communications
- Technical documentation and product instructions
- Writing Manuals in different languages
- Writing Product Reviews
- Supporting Chat and messages
- Customer Inquiries
As this kind of API is part of Machine Language translation. I have written other posts related to these topics. You can also visit those to learn more about this topic.
- Audio to Text by Google Speech API in Salesforce Lightning
- Running Salesforce App using Voice command – Speech-To-Text API
- Add Text-to-Speech Capability in Lightning Component
Steps Required for Text Translation in Salesforce
To handle text translation using a low code approach, we will use the below steps
- Get SysTran API Access
- Create External and Named Credential
- Create a Permission set and Assign it to User
- Create a Custom Metadata Type for Langauge
- Create Flow to Integrate API and Show Translation
- Test the Flow
1. Get SysTran API Access
As we need to implement SysTran API for text translation. We need access to this API. Luckily this API is free to create POC and test functionality.
Create a personal account on the SysTran website by providing the required information. It will send a verification email. Verify your account and login into its dashboard. Open the profile page and create API Key on this page.
Here is the Get URL for this API. Change the API Key with your created key.
https://api-translate.systran.net/translation/text/translate?key=*****-ad*b-482f-a0b5-*****&source=en&target=de&input=Hello, hwo are you today?
Sample Response JSON
{
    "outputs": [
        {
            "output": "Hallo, wie geht es dir heute?"
        }
    ]
}
2. Create External and Named Credential
To use external API using Flow Builder we have to create one External Credential and One Named Credential. These are required for easily maintaining external API callouts.
External Credential
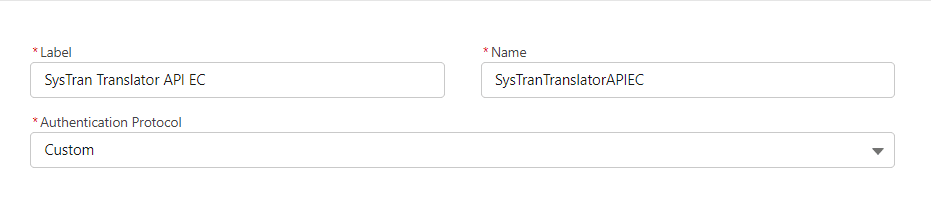
An external credential represents the details of how Salesforce authenticates to an external system via an authentication protocol. Let us create external credentials with the below details
| Property | Property Value |
|---|---|
| Label | SysTran Translator API EC |
| Name | SysTranTranslatorAPIEC |
| Authentication Protocol | Custom |
Create a Principal named SysTranPrincipal on the above-created External Credential page.
| Property | Property Value |
|---|---|
| *Parameter Name | SysTranPrincipal |
| *Identity Type | Named Principal |
| Sequence Number | 1 |
Once the principal is created this external credential can be assigned to the permission set. We will assign this named principal to the permission set in 3rd step.
Named Credential
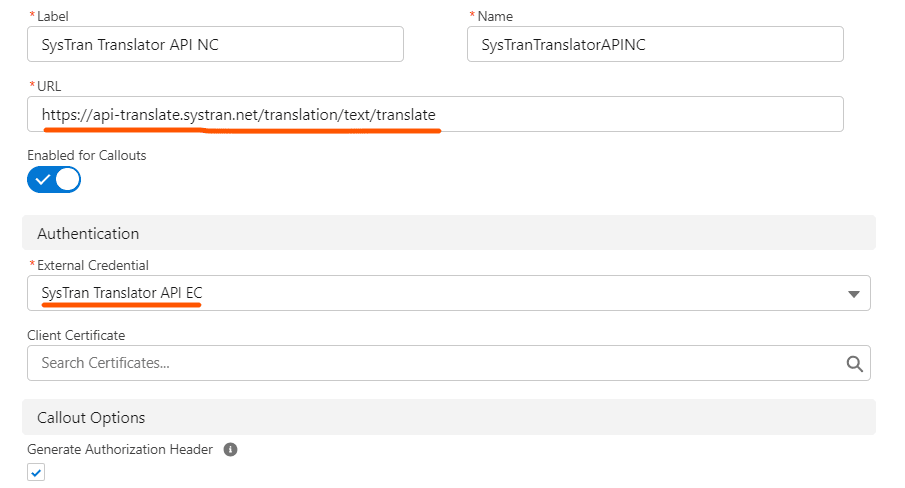
A named credential specifies the URL of a callout endpoint and its required authentication parameters in one definition. Create a named credential with the below details
| Label | SysTran Translator API NC |
| Name | SysTranTranslatorAPINC |
| URL | https://api-translate.systran.net/translation/text/translate |
| Enabled for Callouts | Checked |
| Generate Authorization Header | Checked |
| External Credential | Select above created external credential – SysTran Translator API EC |
3. Create a Permission set and Assign it to User
Create a permission set named SysTran Translator PS. After creating the permission set add the above-created external credential principal in the External Credential Principal Access app.
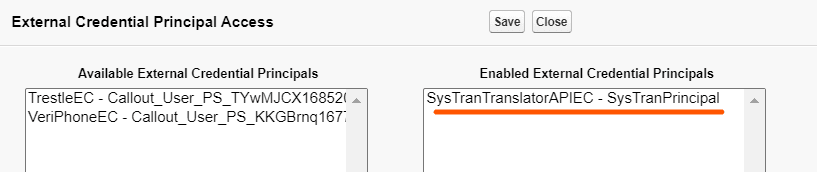
If the Principal is not created in the external credential section then it will not appear in the above screen.
Now assign this permission set to the required user. As we are testing the application, add this permission set to yourself from the user page.
4. Create a Custom Metadata Type for Langauge
Custom metadata is customizable and deployable metadata structure. We can store metadata details that are required by the application for dynamic execution. Create a custom metadata type for storing language information.
| Metadata Property | Metadata Property Value |
|---|---|
| Label | Translation Language |
| API Name | TranslationLanguage__mdt |
Create a custom field Language Code with the below detail.
| Field Label | Language Code |
| Field API | LanguageCode__c |
| Data Type | Text(5) |
Sample Records
| Label | Language Code |
|---|---|
| English | en |
| French | fr |
| Italian | it |
| Japanese | ja |
These are sample records, you can add all language and their code in this custom metadata.
5. Create Flow to Integrate API and Show Translation
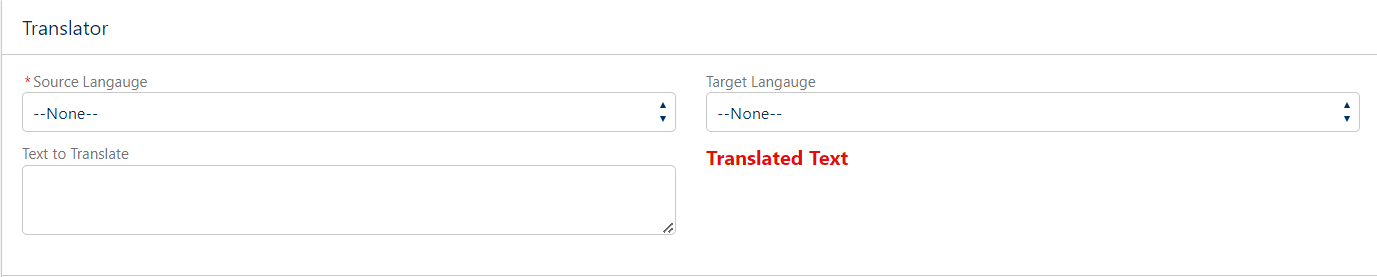
We are ready with the required information to integrate translation API. Let us create a Screen flow named Translator Demo with the below UI.
We will create the below actions for our requirement to translate text into the desired language.
- Create Record Choice Set for Language
- Add Screen Element
- Add HTTP Callout Action
- Get Translated Text from the response
a. Create a Record Choice Set for Language
Create a collection variable to get all languages from the above-created custom metadata type-TranslationLanguage__mdt. This collection variable will be used in the source and target picklist. Create a Record Choice Set variable named translationLanguage.
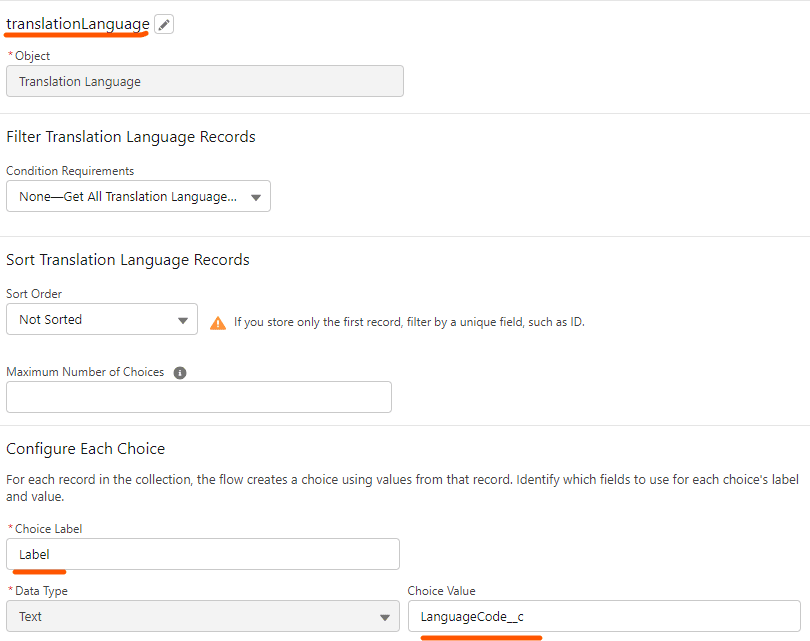
| Variable Property | Property value |
|---|---|
| Object | Translation Language (TranslationLanguage__mdt) |
| Condition Requirements | None |
| Sort Order | Not Sorted |
| Choice Label | Label |
| Data Type | Text |
| Choice Value | LanguageCode__c |
b. Add Screen Element
As per the screen, we will add two picklist controls for the source and target language. I have used the below values for creating it.
| Property | Source Picklist Control | Target Picklist Control |
|---|---|---|
| Label | Source Langauge | Target Langauge |
| API Name | sourceLangauge | targetLangauge |
| Data Type | Text | Text |
| Let Users Select Multiple Options | No | No |
| Component Type | PicklIst | PicklIst |
| Choice | translationLanguage | translationLanguage |
| Default Value | {!sourceLangauge} | {!targetLangauge} |
Add two more fields for entering source text and displaying translated texts.
| Control Property | Text Area Control | Display Text Control |
|---|---|---|
| Label | Text to Translate | |
| API Name | Text_to_Translate | translatedMessage |
| Default Value | {!Text_to_Translate} | Translated Text {!translatedText} |
c. Add HTTP Callout Action
Add an action element on the canvas area after the above screen element. This will show the below screen.
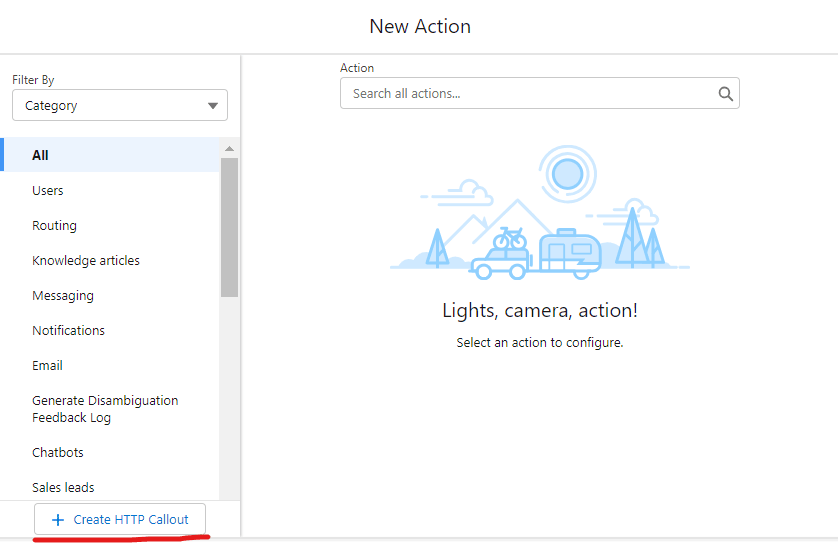
Create External Service with Name CallSysTranslationService. Select the above-created named credential SysTran Translator API NC in the Named credential picklist.

After saving external service, it will ask to configure Invocable Action. Set properties based on the below table.
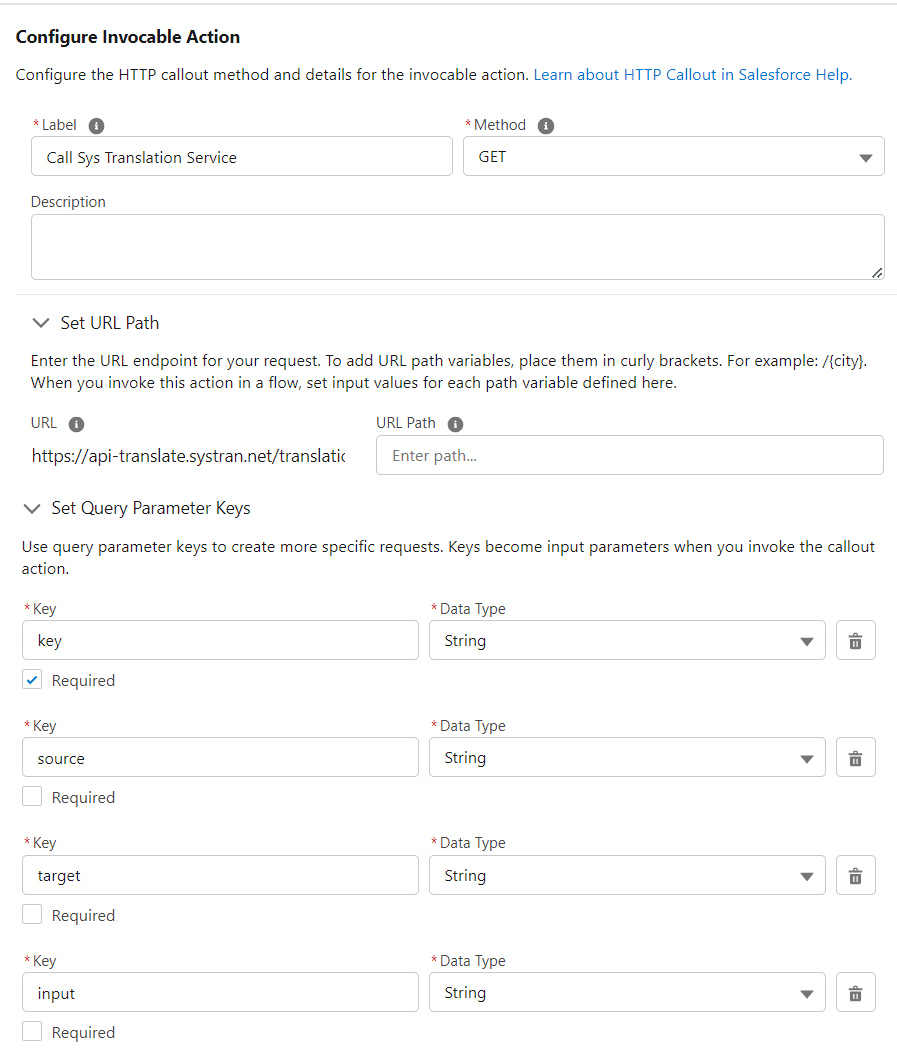
| Property | Property Value |
|---|---|
| Label | Call Translator Service |
| Method | Get |
| URL Path | Already set in Named Credential |
| Query Parameters | Add four parameters of String type with name key, source, target and input |
Add response JSON to create runtime apex class to store response data. Here is the response JSON sample.
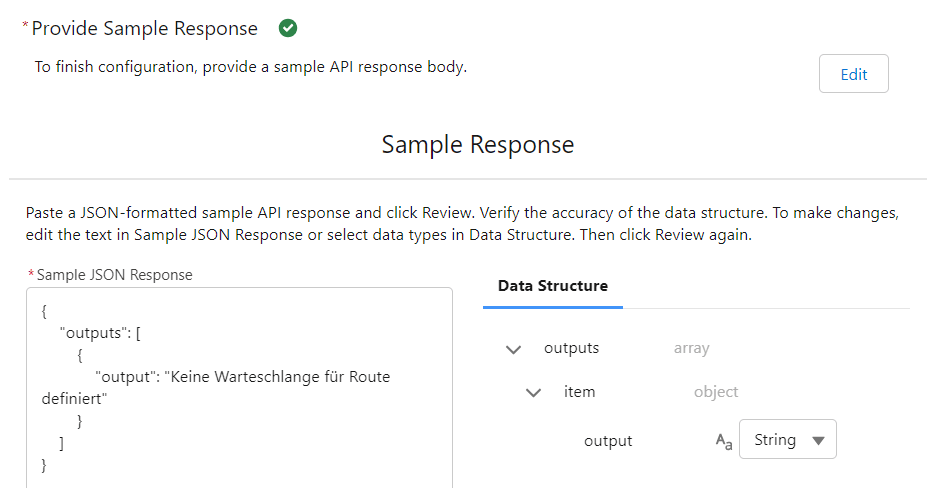
Sample Response JSON
{
    "outputs": [
        {
            "output": "Keine Warteschlange für Route definiert"
        }
    ]
}
once you review the response JSON data structure, proceed further to set parameter values and call the API. As we will get a string collection as a response from API, we have to set response data in the apex wrapper object.
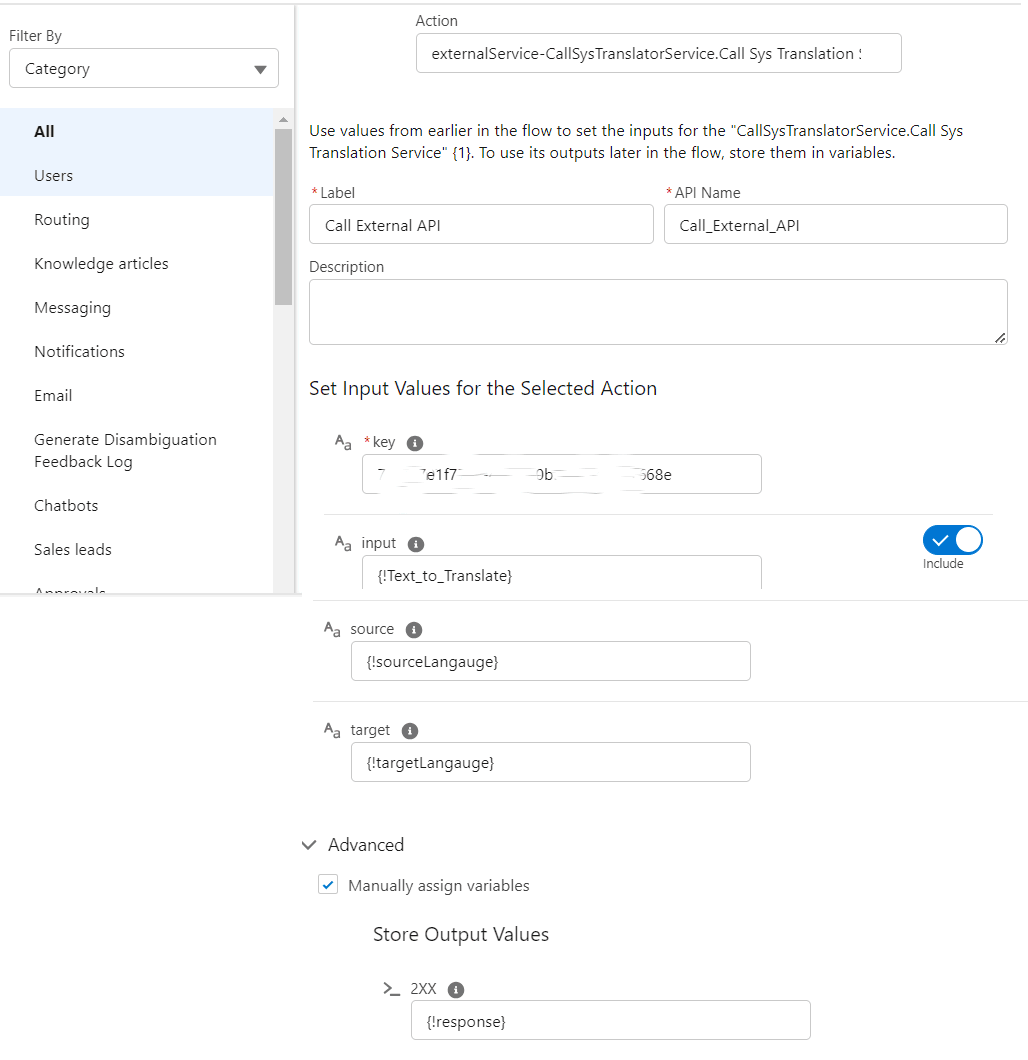
Set all required information to call external service. We need to set values from screen elements and this will be sent to API for processing.
| Property | Property Values |
|---|---|
| Label | Call Sys Translator Service |
| API Name | Call_Sys_Translator_Service |
| input | {!Text_to_Translate} |
| key | 70********8e( Set your API Key) |
| source | {!sourceLangauge} |
| target | {!targetLangauge} |
To store response data, click Advance->Manually assign variables->Store Output Values-> Create a response object.
Create a response variable of the apex-defined type. Apex will be of ExternalService__CallSysTranTransalatorAPI_Callx20Translatorx20Service_OUT_2XX. This apex class will be generated from the above step when we have reviewed the response JSON. If you have put a different name for external service, this apex class name will vary. So you can search the apex class with the external service name and create the variable.
d. Get Translated Text from the response
Our API call is implemented in the above step. We will get a response in the Apex wrapper class which is created automatically when the response JSON is parsed. As per the response JSON, string collection will be returned so we have to iterate the complete string collection and concatenate all translated text in a string variable.
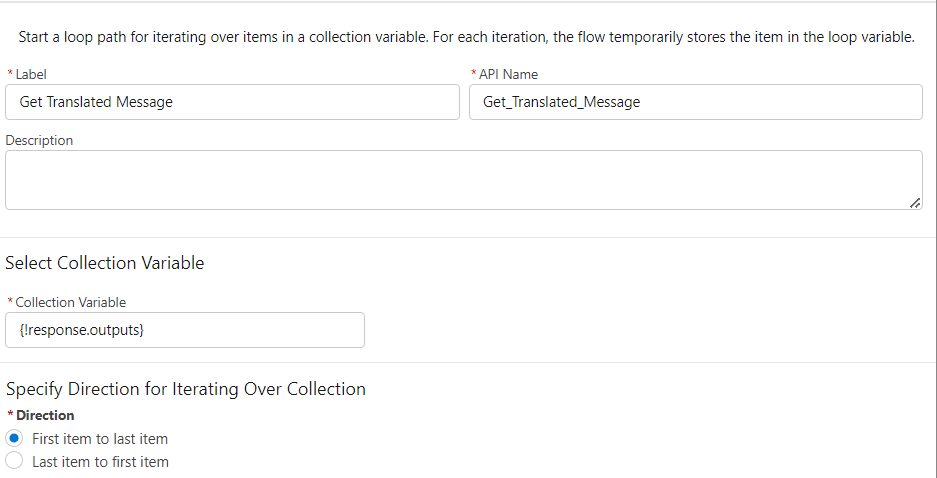
Create a text-type variable named translatedText which will have default value {!$GlobalConstant.EmptyString}. The response will be saved in response object and our translated text collection will be in response.outputs collection. Create a loop named Get_Translated_Message that will iterate on response.outputs collection.
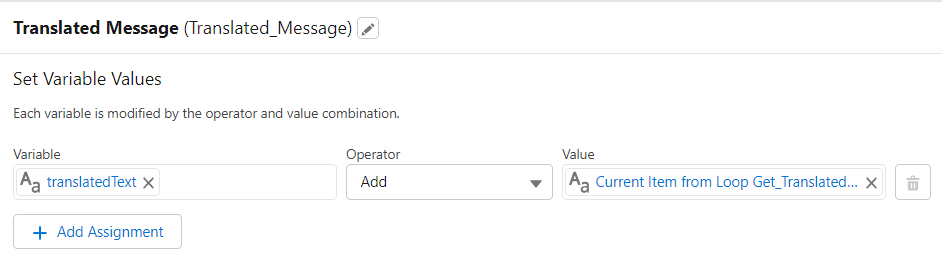
Concatenate translated text in translatedText variable. We can use the assignment element to add the iterated messages in the variable translatedText. You can also set the value as {!Get_Translated_Message.output} in translatedText variable.
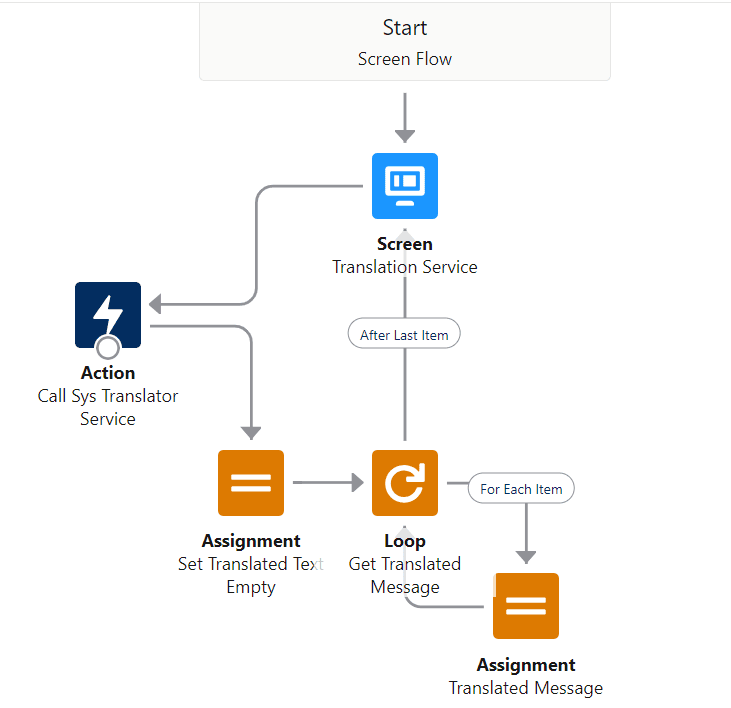
Flow Diagram
6. Test the Flow
Here is a sample video for text translation that is using above-mentioned concepts.
References:
Related Posts
- Extract Demographic Detail using Trestle Reverse Phone API
- Automating data synchronization between Salesforce and Amazon Seller
- Verify Phone using Flow HTTP Callout
Need Help?
Need some kind of help in implementing this feature, connect on my LinkedIn profile Dhanik Lal Sahni.
2 Comments
Hi Team,
In this low-code-integration-for-text-translation-using-systran-api, I am facing issue like an
Error Occurred: Callout failed for invocable action CallSysTranslatorService.Call Translator Service. We couldn’t access the credential(s). You might not have the required permissions, or the external credential “SysTranTranslatorAPIEC” might not exist.
I don’t know why i am getting, i tried what are the in this article.Please give me solution on this
Thanks,
Suhirdass S
Hello Suhirdass,
You have to give access to External Credential to user. It is mentioned in blog also that create permission set for this permission set and assign it to required user. This is good to control integration.
Thank You,
Dhanik