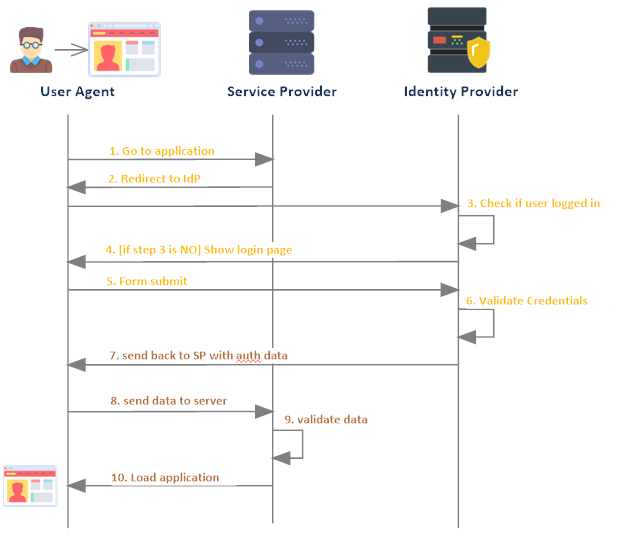
Single Sign-On is authentication mechanism that enable users to securely authenticate with multiple applications and websites by using one set of credentials.
SSO works based upon a trust relationship set up between an application, known as the service provider (in this case Salesforce system), and an identity provider, like Salesforce, Gmail, Microsoft etc.
Identity Providers:
An identity provider (abbreviated IdP or IDP) is a system entity that creates, maintains, and manages identity information for principals and also provides authentication services to relying applications within a federation or distributed network. Identity providers offer user authentication as a service.
In our use case, Salesforce will be used as Identity provider.
Service Providers
A service provider is a vendor that provides IT solutions and/or services to end users and organizations. In our case, Salesforce is Service provider which gives CRM as a service.
Salesforce offers following ways to use Single Sign-on.
- Federated authentication using Security Assertion Markup Language (SAML)
- Federated authentication uses SAML, an industry standard for secure integrations.
- Federated Authentication lets us send authentication and authorization data between affiliated but unruled web services.
- User credential is not validated at service provider, it is validate at identity provider. Identity provider gives detail about user auth detail to service provider.
- Service provider will load data based on auth detail.
- This can be used by enterprise to login into different sub sytem using one set of credential. This reduced lot of time and it is more secure.

- Delegated authentication SSO:
- In delegate authentication, one system is relying on another system to validate user credential. Like we can configure Salesforce org to rely on LDAP (Lightweight Directory Access Protocol).
- This can be used where organization system is access from less secure areas like public system, mobiles etc.
- Username and password is still being sent over internet so it is less secure than Federated authentication.
Single Sign-on Benefits:
- Reduces password fatigue
- Reduces security risks for your customers, vendors, and partner entities
- Simplifies username and password management
- Improves identity protection
- Increases speed where it is most needed
- Relieves help desk workloads
Setting Up Single Sign-on between two Salesforce Orgs:
Many organization has multiple orgs to handle business. There we can setup single-on between those Salesforce Orgs. One Salesforce orgs will be service provider (SP) and second Salesforce Orgs will be identity provider (IP).
Let us setup single sign-on between two Salesforce orgs. Below steps will be required to setup single sign-on.
- Set up My Domain in both Salesforce Orgs
- IP -> Enable Identity providers and create Certificate
- IP->Create connected app
- SP->Single Sign-On Setting based on certificate metadata URL
- SP->Add Single Sign-on setting in my domain
- Setup Users in both SP and IP
1. Set up My Domain in both Salesforce Orgs
My domain will help us in branding our Salesforce orgs. Enabling my domain is also required for
- for working in multiple Salesforce orgs in the same browser
- setting up single sign-on for external identity vendors
- setting up authentication providers like google, facebook etc
- setting up lighting components as tab or standalone apps
By default my domain is already activate in new Salesforce orgs. In case, it is not enabled then go to Setup->My Domain and enable it.
Save both Salesforce orgs domain url. We required these in next steps.
2. IP -> Enable Identity providers and Create Certificate
Enable Salesforce.com as identity provider so that we can use as single sign-on with other sites or Salesforce orgs.
To enable it go to Setup->Identity Provider- Click on Enable Identity Provider button.
Once identity provider is enabled for Identity Provider Salesforce org, create certificate on same screen. Select SelfSignedCert in drop down and save it.

It will create a certificate like below. Generated metadata URL will be used create single sign-on setting in service provider.

3. IP->Create connected app
Create connected app in Identity Provider Salesforce org so that this can be used in service provider org for integration. Use below setting for connected app. We have to setup these information in web app settings section of connected app.
- Connected app name : Salesforce SSO Test
- Entity Id – Add Service provide Salesforce org domain URL
- ACS URL : Add Service provide Salesforce org domain URL
- Subject Type : Federation Id
- Issuer : Add Identity provider Salesforce Org domain URL
Rest setting will be default setting.

4. SP->Single Sign-On Setting based on metadata URL
Now setup single sign-on setting in service provide Salesforce Org. To setup single sign-on go to Setup->Single Sign-On Settings. Click New from Metadata URL to create single sign-on setting for identity provider.

Provide metadata URL which we got while creating certificate in step2 (highlighted in image). Based on metadata URL, it will automatically create single sign-on setting.

Just change SAML identity type, it should be Assertion contains the Federation Id the user objects ( as highlighted).
5. SP->Add Single Sign-on setting in my domain
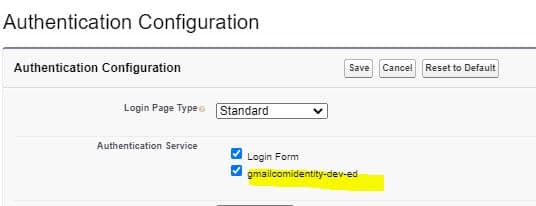
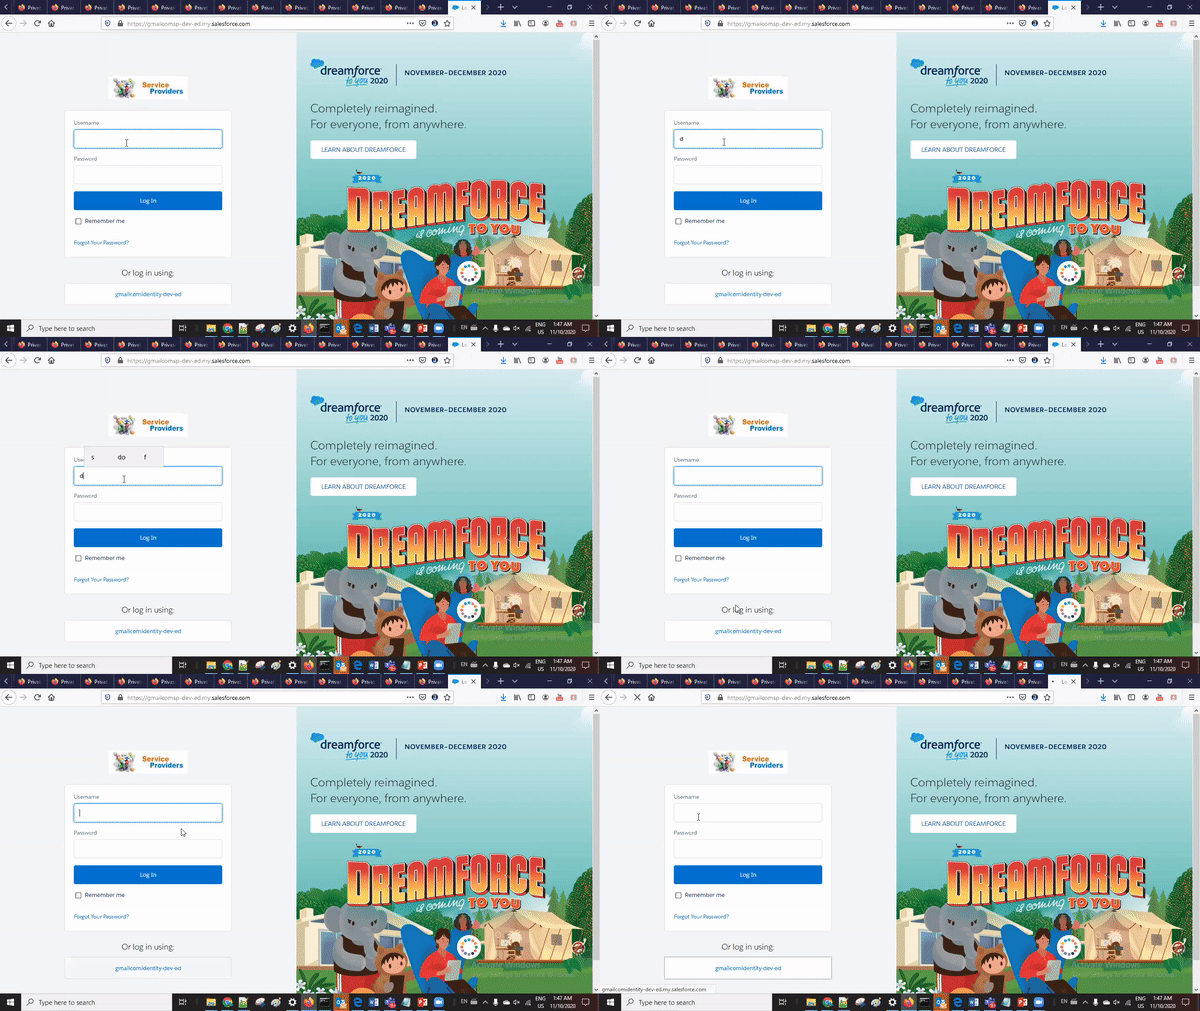
Once single sign-on is setup. Now setup generated single sign-on setting in service provider login screen. As we have setup single sign-on name as gmailcomidentity-dev-ed, it will appear in authentication configuration screen. Select gmailcomidentity-dev-ed and save it, now this single sign-on option will appear on login screen of service provider Salesforce org.

6. Setup Users in both SP and IP
Now setup user in both identity provider Salesforce org and service provider Salesforce org. Setup Federation Id in both Salesforce orgs. I have setup my user email ‘salesforcecodex@*****.com’ in both org’s user records. Similar to below image, setup Federation id in your orgs.

Test Video:

Session Video:
References:
https://help.salesforce.com/articleView?id=connected_app_overview.htm&type=0

