
One of the most important aspects of working with Salesforce Data Cloud is reliably and automatically importing data from external systems into Salesforce. While Salesforce provides connectors for popular platforms, there will be times when you need more flexibility; that’s where the Data Ingestion API comes in.
In this post, we’ll explore what the Salesforce Data Ingestion API is and how to utilize it with Zapier to move data from HubSpot to Salesforce Data Cloud.
Use Case:
A mid-size company uses HubSpot to capture and nurture marketing leads, while their sales pipeline is managed entirely in Salesforce. Traditionally, the sales team had to wait for nightly data syncs or depend on manual exports from HubSpot, leading to delays in following up with new prospects.
By leveraging the Salesforce Data Ingestion API with Zapier, every new lead created in HubSpot is pushed into Salesforce in near real-time. This immediate availability of fresh lead data enables the sales team to engage prospects faster, reduce response times, and ultimately increase conversion rates.
What is the Salesforce Data Ingestion API?
The Data Ingestion API allows developers to push external data into the Salesforce Data Cloud programmatically. Think of it as a pipeline where you can feed data from any external source (CRM, marketing platform, ERP, or custom app) into Salesforce’s data lake.
Some key features:
- Supports real-time and batch ingestion.
- Works with JSON payloads over REST.
- Helps unify external data with Salesforce Customer 360.
- Ideal for scenarios where Salesforce doesn’t have a prebuilt connector.
Why Use Zapier?
Zapier is a no-code automation platform that connects thousands of apps, including HubSpot, Salesforce, Gmail, AWS, Google Sheets, etc. By combining Zapier with Salesforce’s Data Ingestion API, we can:
- Trigger data transfer automatically when an event happens in HubSpot (e.g., a new lead is created).
- Format and transform HubSpot data before pushing it into Salesforce.
- Avoid manual CSV exports and complex integration code.
Let us sync Salesforce Data Cloud and HubSpot using the Zapier tool.
1. Set up Salesforce Data Cloud
1.1. Set up Ingestion API
To enable Salesforce Data Cloud to receive and process data from external systems, we have to configure it to leverage the Salesforce Data Ingestion API. This configuration requires establishing secure connections, defining appropriate data formats, and mapping incoming data to Salesforce Data Model Objects (DMOs), ensuring the information can be effectively utilized for analytics, personalization, and customer insights.
An Ingestion API connector will be created for the connection and insertion of transaction records. This connector can be configured by navigating to Setup → Data Cloud → External Integrations → Ingestion API, or by searching for Ingestion API directly in the Setup search box.
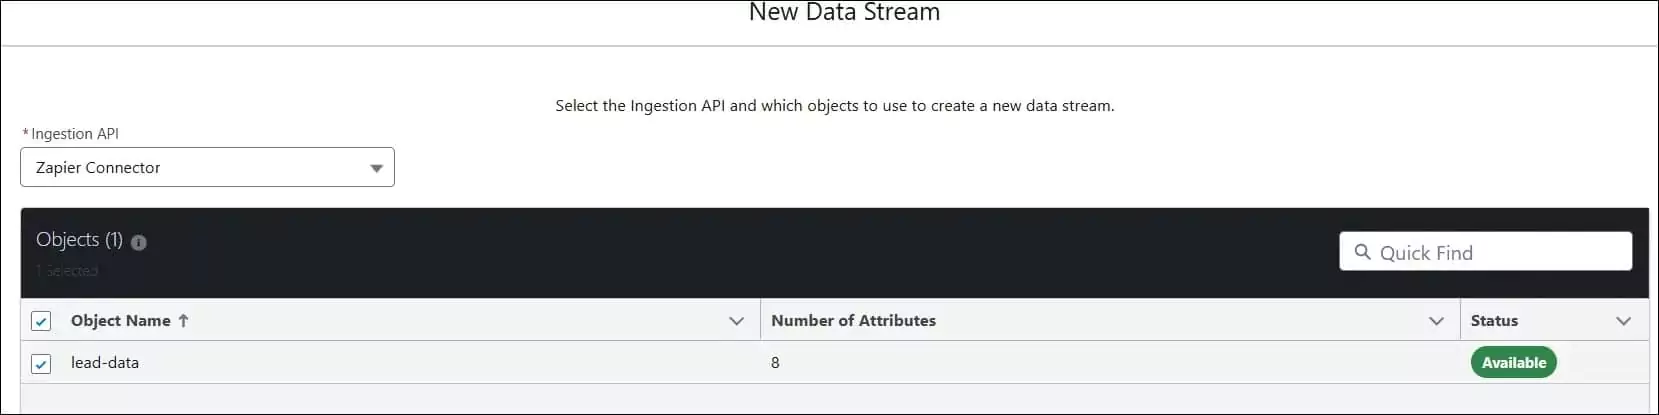
Create a new connection, ‘Zapier Connector’, to the Ingest API source.
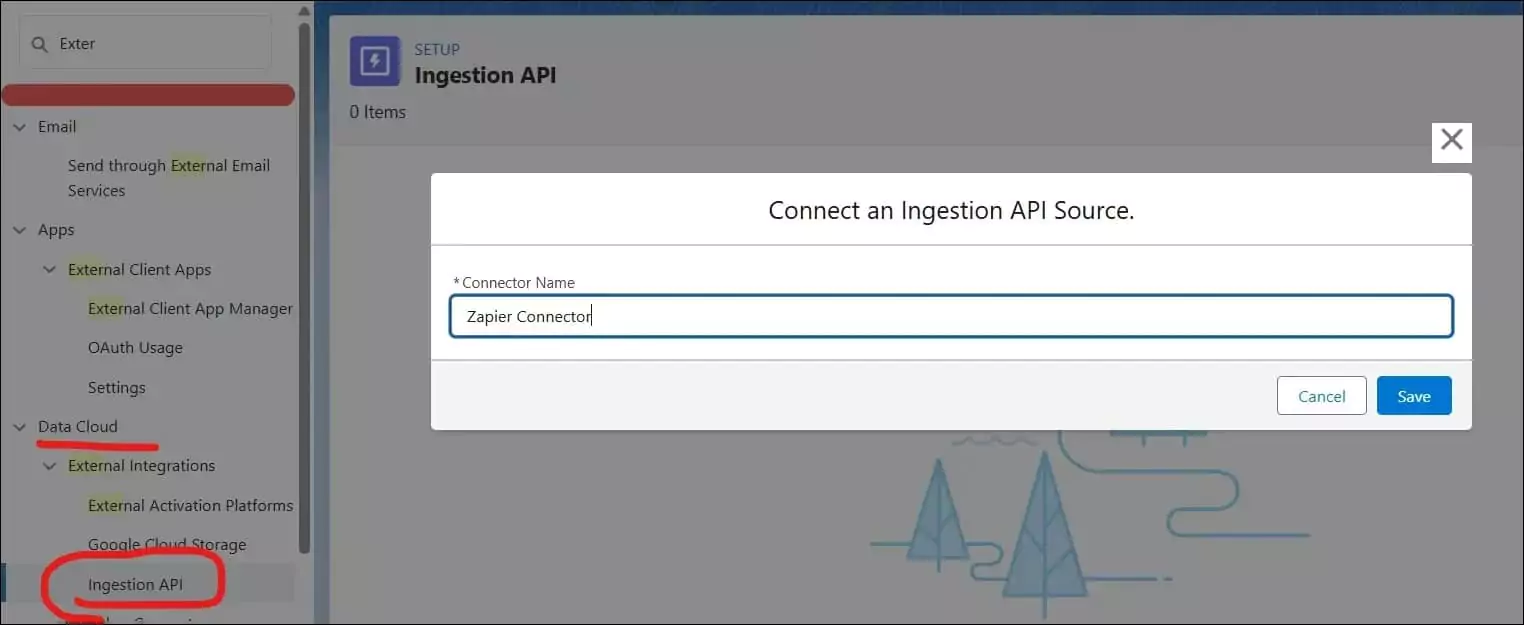
It will create a new connection, and its connection status will be schema required.
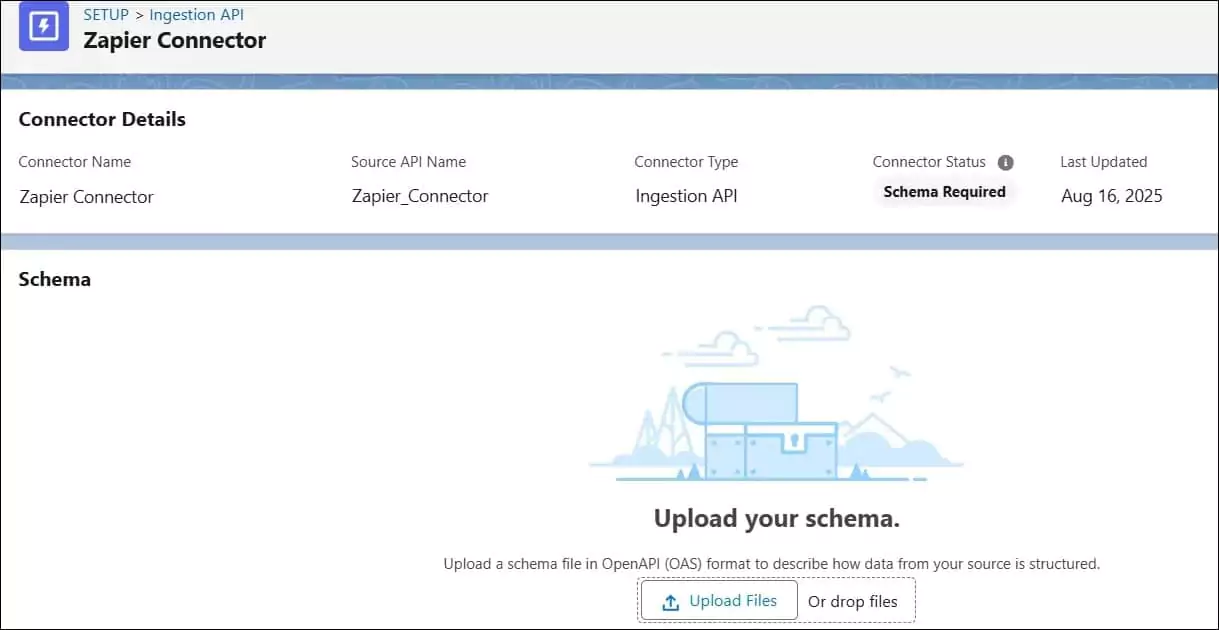
1.2. Create API Schema for Ingestion API
An API schema must be defined for leads, which will be represented in a YAML file. For this use case, we will create a file named ZapierApp.yaml.
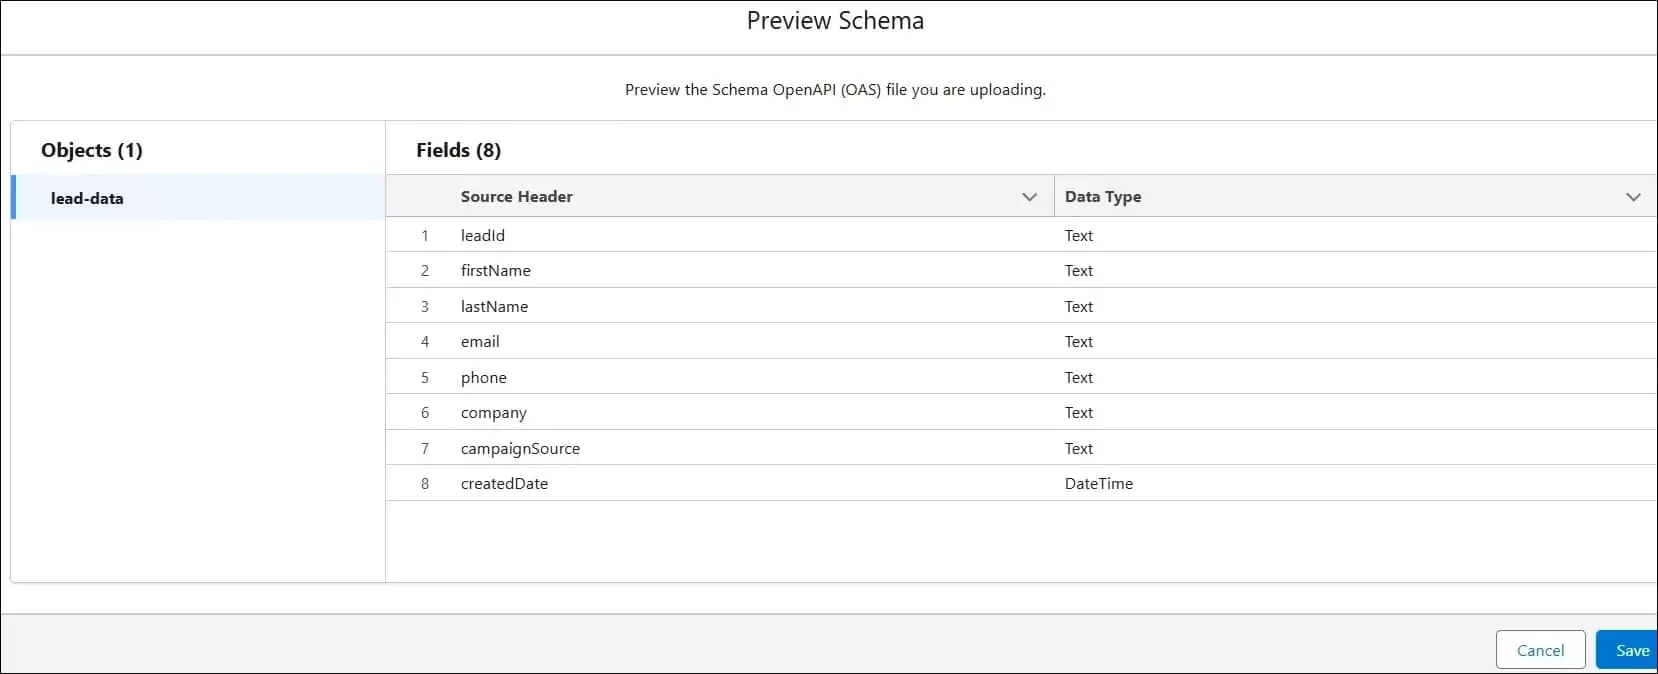
This schema specifies a Lead_Data object with the following attributes (fields): leadId, firstName, lastName, email, phone, company, campaignSource, and createdDate.
Once created, the YAML file must be uploaded to the Schema section of the previously configured Zapier Ingestion Connector. If the file is valid, it will be successfully uploaded. This YAML file is available here.
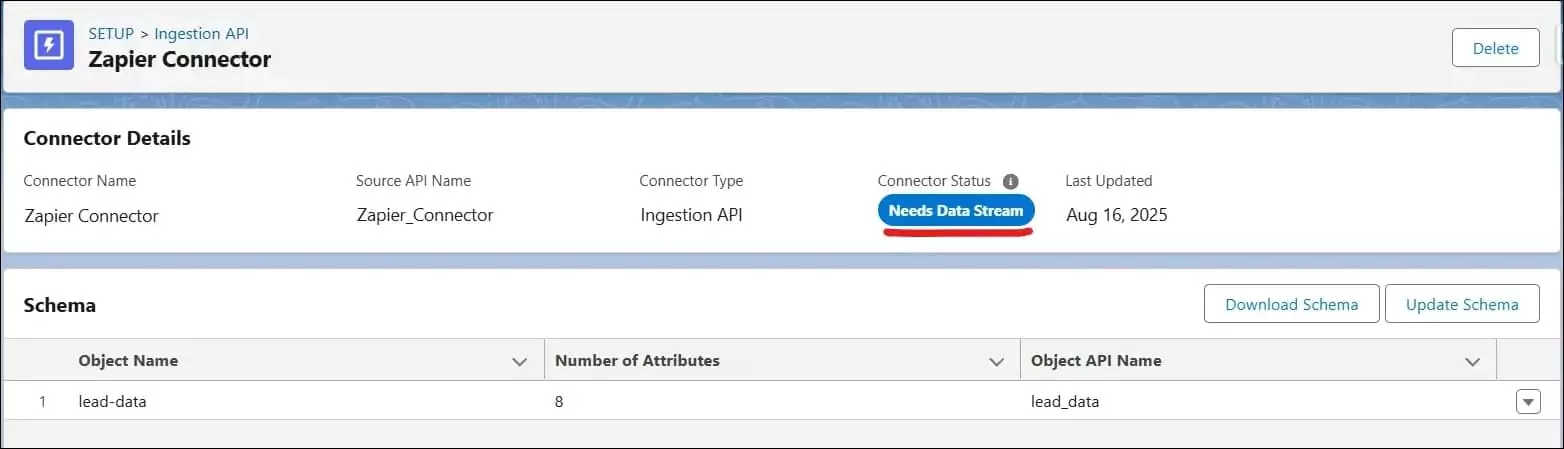
After successfully uploading, the connector status will change to Need Data Stream.
1.3. Create and Deploy Data Stream
To create a new data stream, navigate to the Data Stream tab and click the New button. This action will open the New Data Stream dialog, where you can select Ingestion API as the source.
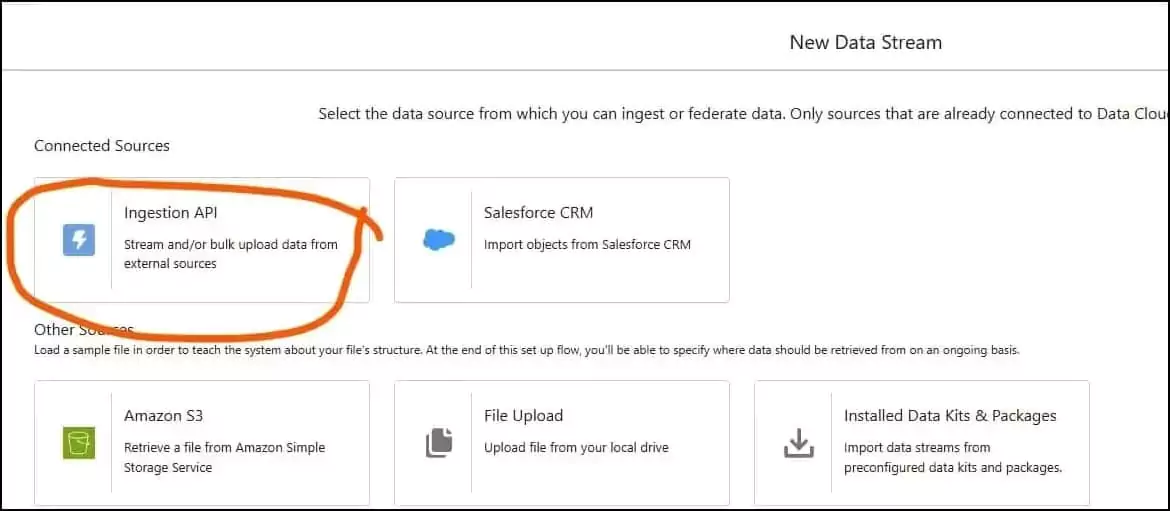
The Ingestion API option becomes visible only when at least one Ingestion API connector has been configured within the org. Once available, it will display the objects that have been created through a schema upload. From this list, select the Lead_Data object and proceed with the next steps.
On the next screen, you will be prompted to configure the object attributes, including the category, primary key, and event time field. After completing these selections, proceed to the data space configuration screen. Choose the appropriate data space for the data stream object and click Deploy.
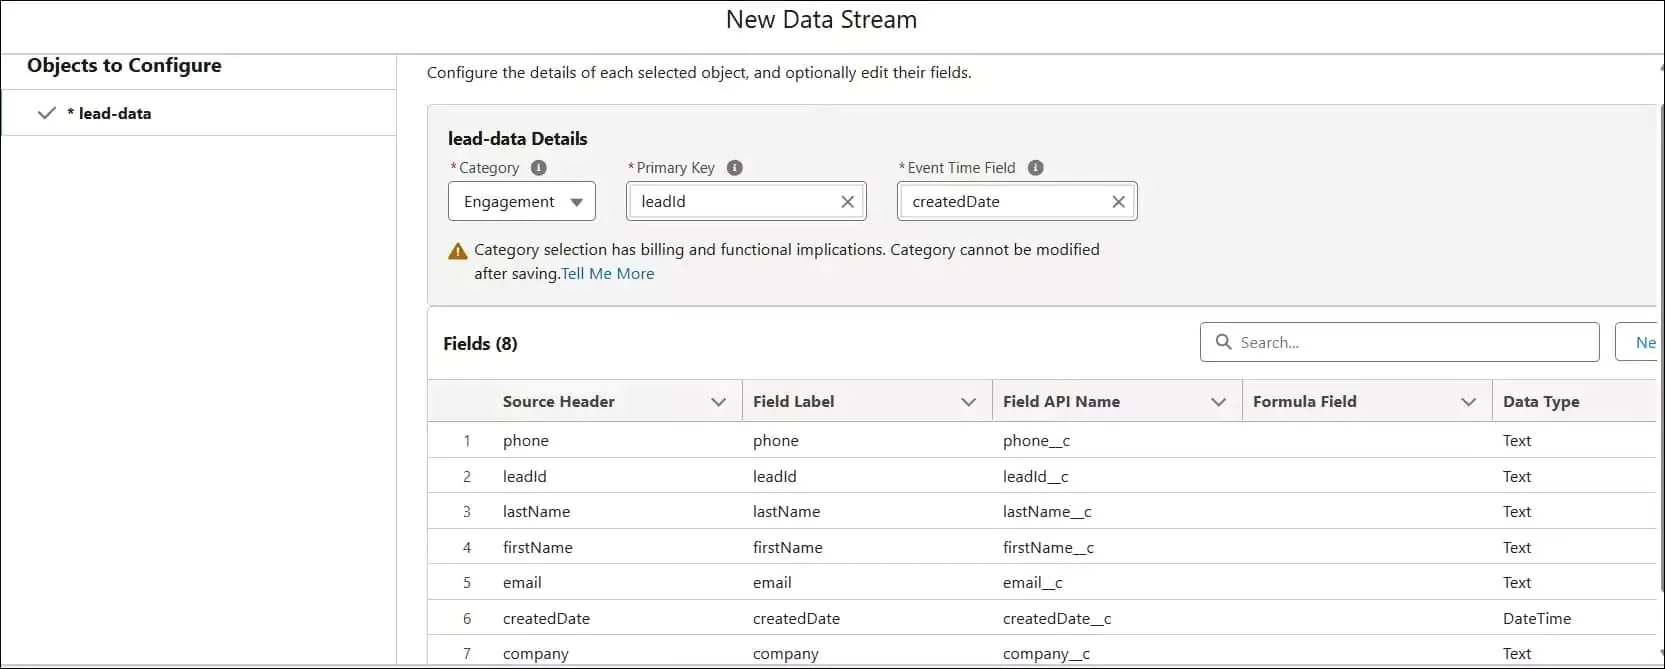
This action will create the data stream and data lake object.


2. Create a Salesforce Connected App
Salesforce Data Cloud objects are not available directly to Zapier, so we will use the Salesforce Ingestion API to load data. Let us create a connected app to authenticate Zapier using a custom webhook request.
Refer to our blog post Create Connected App for External Service to create a connected app. Provide the below scopes while creating a connected app.
- Manage user data via APIs (api)
- Perform requests at any time (refresh_token, offline_access)
- Manage Data Cloud Ingestion API data (cdp_ingest_api)
Get the consumer key and security token; we will use them in the next step.
Note: You can create a connected app from Setup -> External Client App -> Settings page.
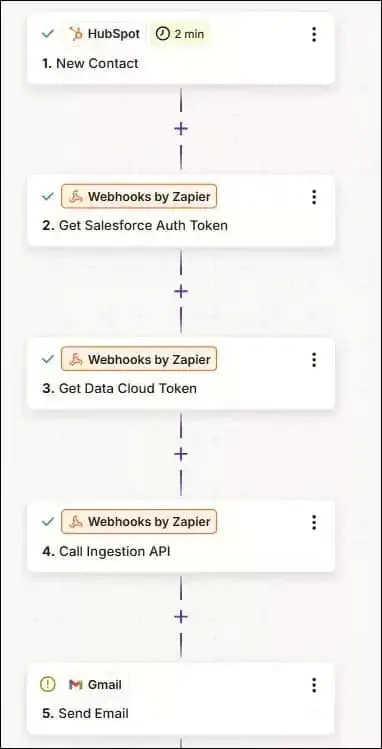
3. Set up Zapier Automation
Let us create a Zap in Zapier to automate record creation from HubSpot to Salesforce. As the Data Cloud object is not available directly in Zapier, we will use a webhook to call the Salesforce Ingest API. The below steps need to be performed to automate record creation.
3.1. Get HubSpot Record
Create a trigger that starts Zap. It will be a HubSpot record creation. Whenever a new contact record is created in HubSpot, this Zap will run automatically.
Setup configuration
- Trigger App: HubSpot
- Trigger event: New Contact
- Account: Connect with your HubSpot account
After configuring it, test the trigger.
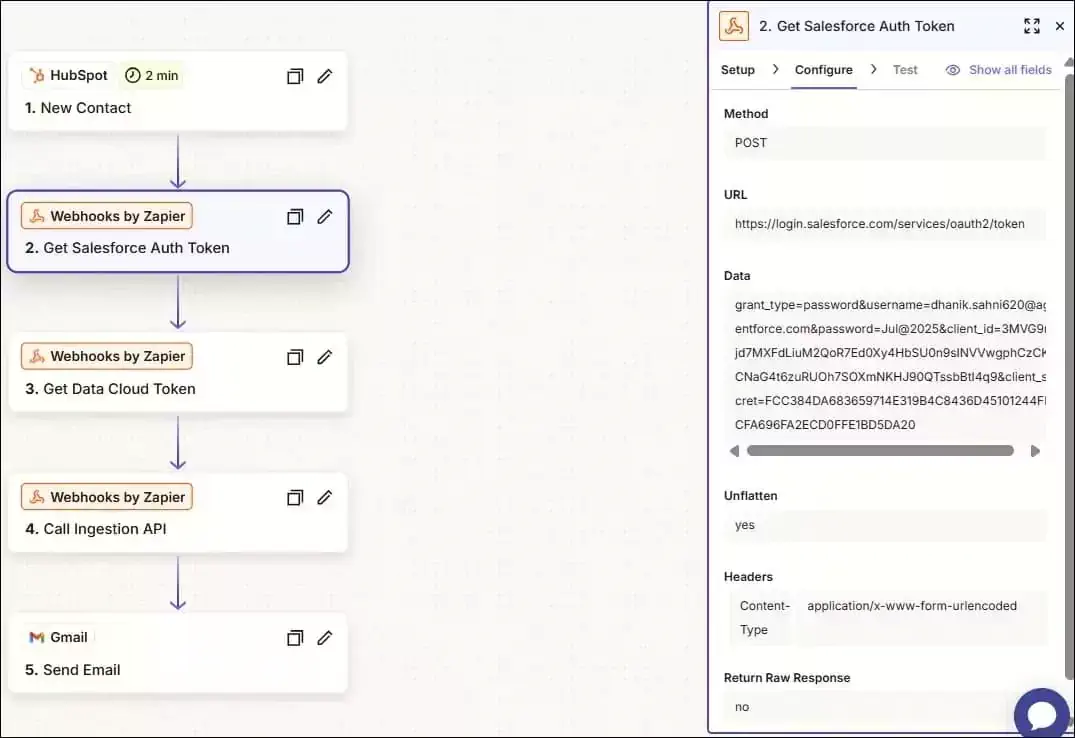
3.2. Get Salesforce Authentication Token
Since we are using the Ingestion API to load data, a Data Cloud access token is required. To obtain this token, we must first generate a Salesforce org access token.
In this step, we will get a Salesforce authentication token by using a custom webhook in Zapier.
Steps for setup
- Setup Tab:
- App: Webhook
- Action Event: Custom Request
- Configure Tab
- Method: POST
- URL: https://login.salesforce.com/services/oauth2/token
- Data: grant_type=password&username={username}&password={password}&client_id={consumer key}&client_secret={consumer secret}. Replace placeholder values with your Salesforce Org details.
- Unflatten: Yes
- Headers:
- Content-Type: application/x-www-form-urlencoded
- Return Raw Response: Yes
- Test Tab
- Test the connection and proceed further.
- We will use the Salesforce access token to get the data cloud access token. The result of this action will be used in the next step.
3.3. Get Data Cloud Access Token
Let us create a step to get a Data Cloud access token by using a custom webhook in Zapier.
Steps for setup
- Setup Tab:
- App: Webhook
- Action Event: Custom Request
- Configure Tab
- Method: POST
- URL: {{315799983__instance_url}}/services/a360/token. 315799983__instance_url is the previous step’s result property. It will be different for you.
- Data: grant_type=urn:salesforce:grant-type:external:cdp&subject_token={{315799983__access_token}}&subject_token_type=urn:ietf:params:oauth:token-type:access_token. {{315799983__access_token}} is the previous step’s result. It will be different for you.
- Unflatten: Yes
- Headers:
- Content-Type: application/x-www-form-urlencoded
- Return Raw Response: Yes
Test the connection and proceed further.
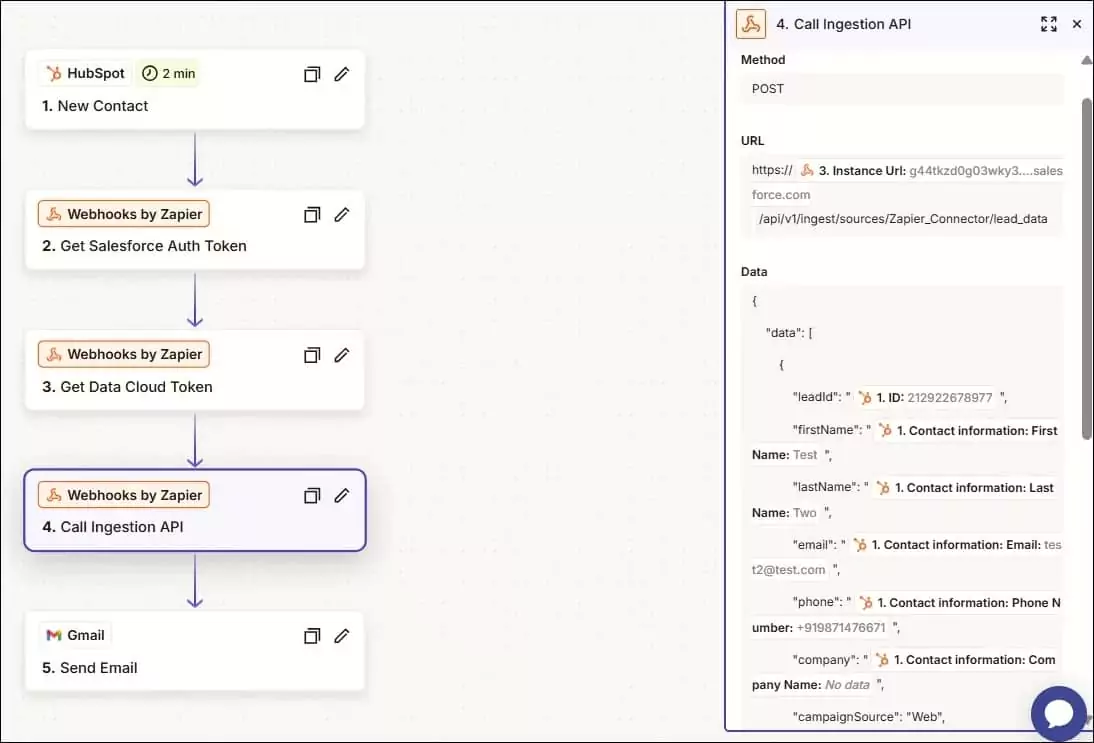
3.4. Call Salesforce Ingestion API
We have the data cloud access token now; let us call the Salesforce Ingestion API. This will also be a webhook request.
Steps for setup
- Setup Tab:
- App: Webhook
- Action Event: Custom Request
- Configure Tab
- Method: POST
- URL: https://{{315799984__instance_url}}/api/v1/ingest/sources/Zapier_Connector/lead_data. 315799984__instance_url is the previous step’s result property. It will be different for you. Ingestion API URL is https://<instance_url>/api/v1/ingest/sources/{Ingestion API connector name}/{objectname}
- Data: {“data”:[{“leadId”:”{{315799982__id}}”,”firstName”:”{{315799982__firstname}}”,”lastName”:”{{315799982__lastname}}”,”email”:”{{315799982__email}}”,”phone”:”{{315799982__phone}}”,”company”:”{{315799982__company}}”,”campaignSource”:”Web”,”createdDate”:”2021-10-22T09:11:11.816319Z”}]}. It is JSON-formatted data, and placeholder information is the previous step’s result. It will be different for you.
- Unflatten: Yes
- Headers:
- Content-Type: application/x-www-form-urlencoded
- Authorization: Bearer {{315799984__access_token}}. {{315799984__access_token}} is taken from previous step
- Return Raw Response: Yes
Test the connection and proceed further.
3.5. Send Email
Create a step to send an email after process completion.
Steps for setup
- Setup Tab:
- App: Gmail
- Action Event: Send Email
- Account: Connect with your gmail account
- Configure Tab
- To: Provide receiver email
- From: salesforcecodex@gmail.com
- Subject: Ingestion Status
- Body: Ingestion successful.
- Test this step as well.
After successful testing, publish this Zap.
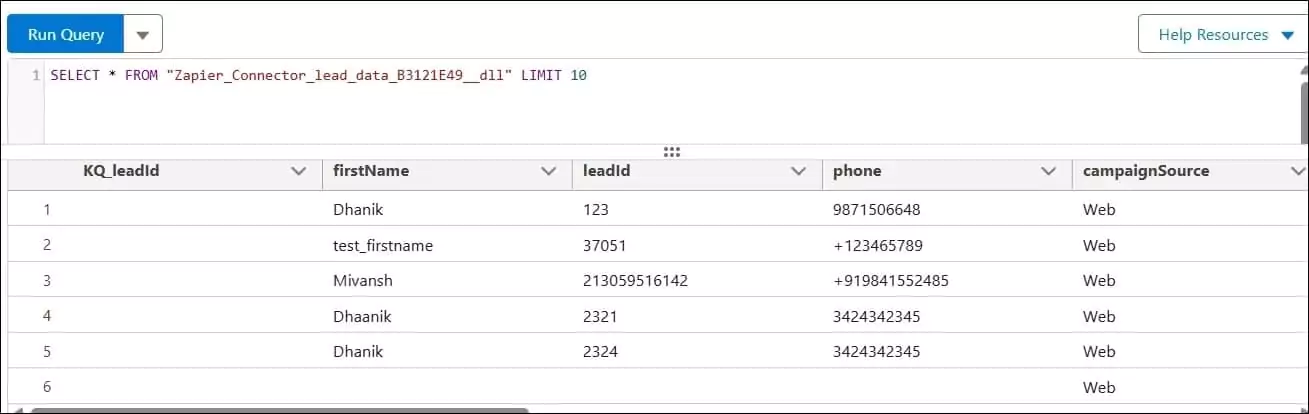
4. Test Functionality
Create a new record in HubSpot, and it will run the above Zap and insert a new record in the Data Cloud Lake object.
To check records, run a SQL query from the Query Builder page.
Need Data Cloud Expert?
If you need Salesforce Data Cloud Experts, contact us or send an email to salesforcecodex@gmail.com.
References:
- Get Started with Ingestion API
- Load Data Programmatically with the Ingestion API
- Ingest Data in Salesforce Data Cloud using Data Ingestion API
Recent Posts
- Prevent Large Data Queries in Salesforce with Transaction Security Policies
- The Ultimate Guide to Data Cleanup Techniques for Salesforce
- How to Leverage Model Context Protocol (MCP) to Enhance Salesforce AI
- Top Mistakes Developers Make in Salesforce Apex Triggers
- Introducing Agentforce3 to Salesforce Developers