
Modern web applications are expected to provide secure, seamless, and passwordless access, especially when integrating with external platforms like Salesforce Experience Cloud. For enterprise scenarios, asking users to re-enter Salesforce credentials from a custom .NET web application is not only a poor user experience but also introduces security and compliance risks.
Salesforce offers multiple OAuth authentication flows, but most of them are designed for browser-based or user-interactive logins. These approaches typically redirect users to a Salesforce-hosted login page, which breaks the user journey and complicates single sign-on (SSO) strategies. In contrast, modern web apps often require a headless authentication model, where Salesforce access happens transparently after the user logs into the application’s own identity system.
In this blog, we’ll walk through how to log in to Salesforce Experience Cloud without exposing or requesting user credentials, using a .NET-based web application and the OAuth 2.0 JWT Bearer Flow. This backend-driven approach allows your application to securely authenticate users on behalf of Salesforce, eliminating the need for a Salesforce login screen while maintaining enterprise-grade security.
Steps to perform
- Create a Certificate for JWT Bearer Token Authentication
- Create Connected App in Salesforce
- Generate Access Token in .NET Web App
- Get Salesforce Experience Cloud Access URL
- Redirect from ASP.NET to Salesforce Experience Cloud
1. Create a Certificate for JWT Bearer Token Authentication
As mentioned in the intro section, we will use the JWT Bearer flow; we need a certificate for secure authentication between .NET and Salesforce. A JWT bearer token is signed using a public–private key pair from a certificate. The private key signs the token, and the public key is used to verify it, which ensures the token has not been altered and can be trusted.
We can use OpenSSL to generate a private key and a self-signed X.509 certificate for signing and verifying JSON Web Tokens (JWTs).
Step 1.1 : Generate a private key
Run the following OpenSSL command. It will generate server.key. You can change this name.
openssl genrsa -out server.key 4096
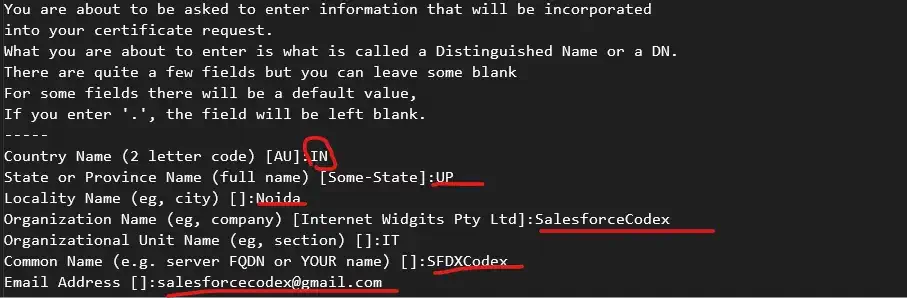
Step 1.2: Create a Certificate Signing Request (CSR)
Create a certificate signing request. Use the above-created server.key in this command.
openssl req -newkey rsa:2048 -keyout server.key -out server.csr
This command will prompt for a few details, such as PEM password, country name, organization name, common name, etc. Provide these details to create a CSR file.
Step 1.3: Generate a self-signed certificate
Salesforce does not require a CA-signed certificate. A self-signed cert is sufficient. So, create a self-signed certificate.
openssl x509 -req -sha256 -days 365 -in server.csr -signkey server.key -out server.crt
This produces a server.crt a public certificate. This will be uploaded to the connected app.

Step 1.4: Generate the PFX file
Generate a PFX file to be used in a .NET application. A PFX file is a secure certificate container used to store cryptographic keys and certificates together in a single file.
openssl pkcs12 -export -out server.pfx -inkey server.key -in server.crt
2. Create Connected App in Salesforce
Create a connected app that allows the .NET application to integrate with Salesforce seamlessly. You can refer to the post Generate Salesforce Authentication Token using Postman for more information about connected apps in Salesforce.
Let us create a connected app named Dot Net Connector App
- Go to Setup -> External Client Apps -> Settings
- In the Connected Apps section, click on the New Connected App button. If this button is not enabled, then click on the Allow creation of connected apps flag. It will open the Connected App creation page.
- Connected App Name—Dot Net Connector App
- Contact Email – ( Provide email)
- Contact Phone – Provide contact number
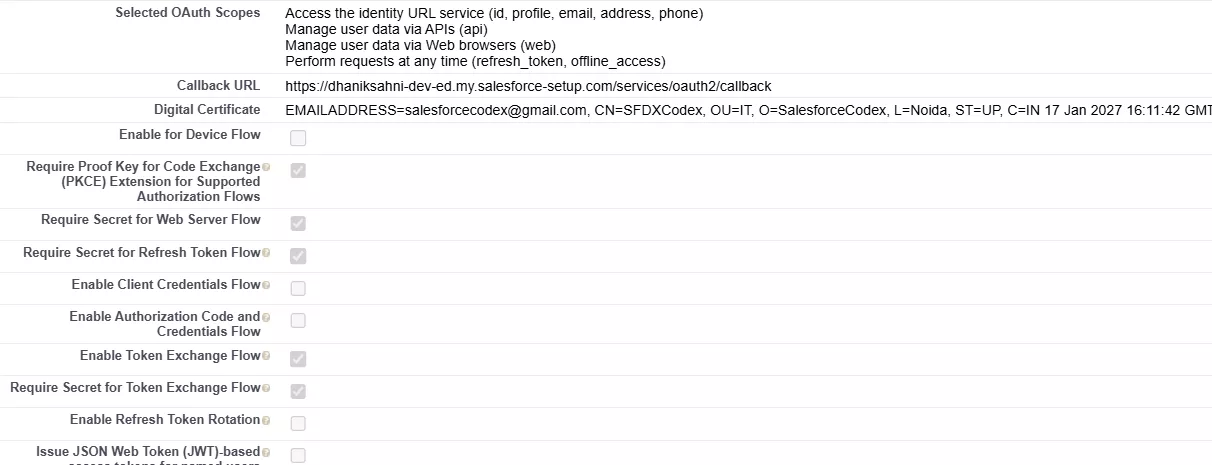
- Enable OAuth Settings – Mark Checked
- Use digital signatures—Mark checked. Upload the certificate created from step 1.3.
- Selected OAuth Scopes—Select api, web, (refresh token, offline access) and (ID, profile, email, address, phone) scopes
- Enable Token Exchange Flow – Mark Checked
- Save Connected App
- Get the connected app consumer ID from this step. It will be used in getting a JWT assertion token.
- Manage Policy for Connected App
- Permitted Users – Admin Approved user are pre-authorized
- IP Relaxation—Relax IP restrictions
- Refresh Token Policy: Refresh token is valid until revoked
- Enable Token Exchange Flow – Select checkbox
- Save policy

- Select Profile/Permission Sets
- Select the profile or permission set for which this connected app will be preapproved.
- Save the app
- If we do not complete this step, we will encounter an error.
{"error":"invalid_grant","error_description":"user hasn't approved this consumer"}
3. Generate Access Token in .NET Web App
We have completed the pre-requisite for the Salesforce and .NET applications. Let us add code to integrate both apps.
As mentioned above, we will use a JWT bearer token, so we need to create the assertion based on the user, and then we create the access token.
3.1. Get JWT Assertion Code
We will create a JWT assertion that is used for Salesforce JWT Bearer OAuth authentication. The JWT identifies the Connected App as the issuer and represents a specific Experience Cloud user as the subject.
The token includes required claims such as scopes for API and web access, along with issue and expiry times to prevent replay attacks and clock-drift issues. Once signed, the method returns the JWT as a string.
To get an assertion token, we need to use a payload in the format
{
"iss": "Clint_ID From Step 2",
"sub": "portal user name",
"aud": "LoginURL https://[login/test].salesforce.com",
"exp": "CurrentTimeStemp+2min"
}
Along with this payload, we might need to pass scope for this token. We can use the same scope, which we added in the connected app creation step.
3.2. Get JWT Access Token
The above-created assertion token is sent to Salesforce’s OAuth token endpoint to obtain an access token, without ever exposing user credentials.
Let us create a JWT access token with the token API /services/oauth2/token. As we need to access the Experience Cloud site, we need to generate a token for site access.
Token URL: {SiteUrl}/services/oauth2/token
If we want to use a Salesforce Sales/Service, then it will be https://login.salesforce.com/services/oauth2/token.
grant_type= urn:ietf:params:oauth:grant-type:jwt-bearer&
assertion= <Token Generated from 3.1>
4. Get Salesforce Experience Cloud Access URL
We have an access token from the previous step, 3.2. This access token can be used for server-to-server access.
As we need to open the Experience Cloud site, we need the UI access token to navigate the site. We will use singleaccess redirect URL.
Url : {instanceUrl}/services/oauth2/singleaccess
We need to pass access_token and redirect_uri to this URL.
It will return the UI access token. Using this token, we will use frontdoor.jsp to redirect to the Experience Cloud site.
5. Redirect from ASP.NET to Salesforce Experience Cloud
Use the above to create SalesforceSyncHelper class to get the front door URL. Response. Redirect will be used to redirect the URL.
SalesforceSyncHelper helper = new SalesforceSyncHelper();
string jsonString = helper.GetFrontdoorUrl().Result;
using (JsonDocument doc = JsonDocument.Parse(jsonString))
{
   string frontdoorUri = doc.RootElement.GetProperty("frontdoor_uri").GetString();
   Response.Redirect(frontdoorUri, false);
}
Complete Code:
References
Related Posts
- Top Mistakes Developers Make in Salesforce Apex Triggers
- The Ultimate Guide to Apex Order of Execution for Developers
- How to Handle Bulkification in Apex with Real-World Use Cases
- How to Confidently Manage Transactions in Salesforce Apex
- How to Implement Dynamic Queueable Chaining in Salesforce Apex
- How to Implement Basic Queueable Chaining in Salesforce Apex
- How to Suppress PMD Warnings in Salesforce Apex
- Top 10 PMD Issues Salesforce Developers Should Focus on in Apex
- Enhancing Performance with File Compression in Apex
- How to Correctly Publish Platform Event Using Salesforce Apex