
Salesforce has the capability to integrate with all applications that support API handshake. We can integrate with any Enterprise Resource Planning (ERP), Marketing Automation Platforms, E-commerce Platforms, Business Intelligence (BI) and Analytics Tools, Customer Support and Helpdesk Systems, Collaboration and Communication Platforms, Social Media Platforms, Document Management Systems, etc. This post will integrate Salesforce and Amazon Seller to automate data synchronization for e-commerce businesses.
What is Amazon Seller?
Amazon Seller is a platform provided by Amazon that allows individuals and businesses to sell their products on Amazon’s marketplace. It enables sellers to create product listings, manage orders, and handle payments for their products. Amazon Seller offers various tools and services that help sellers reach a larger audience, enhance their product listings, and optimize their sales performance.
Business Requirement
We need to synchronize Amazon Seller orders within Salesforce CRM so that the company can give better support to customers.
Solution
We can integrate the Amazon Seller platform with Salesforce using Amazon Seller Partner API. We will build batch classes to pull orders from the Amazon Seller Platform on a daily basis. This batch class then will create orders within the Salesforce platform objects.
Limitation of Amazon Seller Partner API
Amazon Seller Partner API will not provide complete order detail within one API call. We have to call different APIs to get complete order details. So considering this limitation we can design our solution to synchronize orders.
For this post, we will only get basic order detail from the Amazon Seller platform. We will only pull orders with the amount and customer shipping address.
Steps for Amazon Seller Partner API Integration
- Create Developer Account in Amazon Seller Central
- Create a User in Amazon IAM
- Create an Inline Policy for Amazon IAM User
- Create an Application for external API access
- Generate Refresh Token for Application
- Create Named Credential and External Credential
- Create a custom object to put order detail
- Create a Batch Class to sync records
1. Create Developer Account in Amazon Seller Central
We need an Amazon seller developer account to use its SP-API. We can register our new Amazon seller account by this link (USA region), and after we pass registration and verification we can request an upgrade to a Developer account by this link.
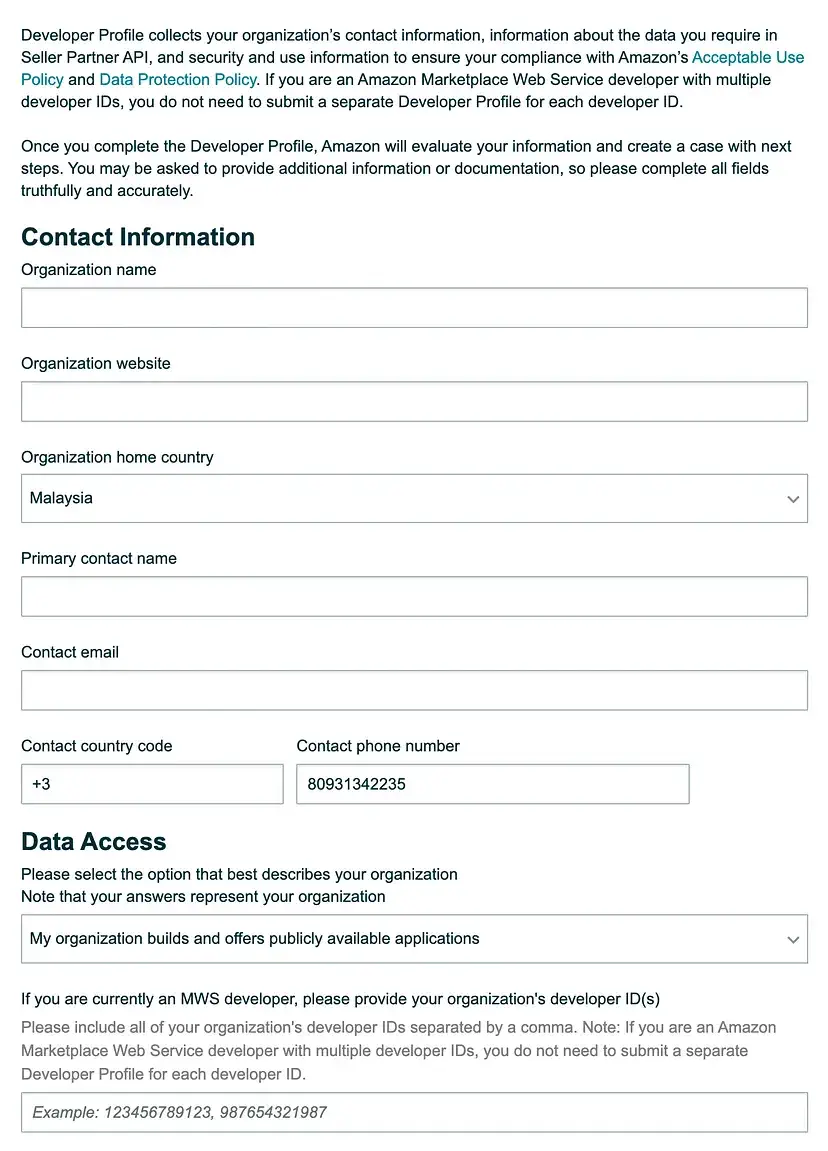
We should put the correct information while filling out this form.
The next step is very important as we have to choose all required access for the developer account. Based on the requirement select from available options.
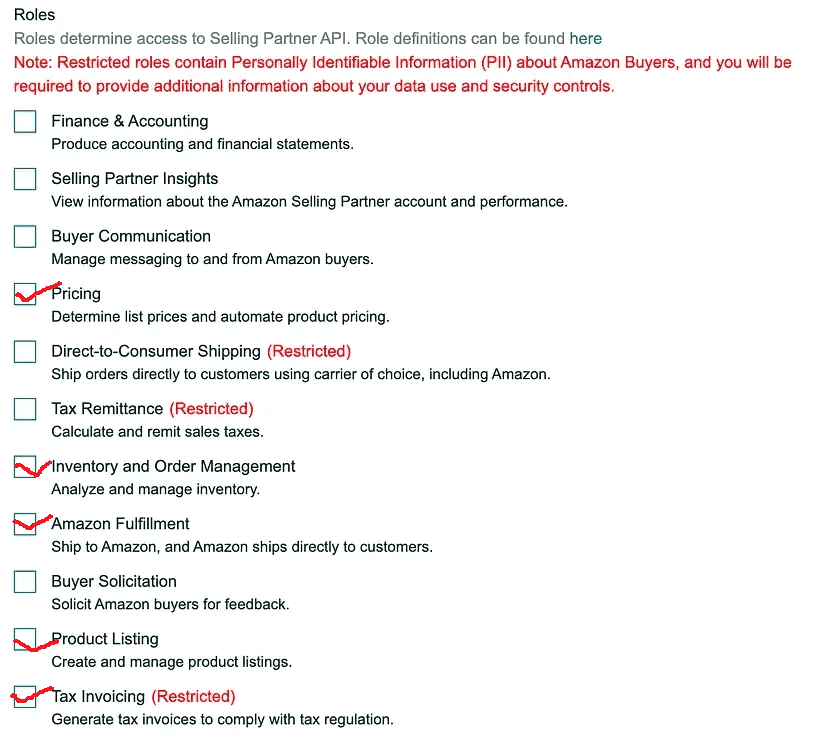
These options can be different for you based on requestor access or services opted by license. You can find details explanations about each of the roles on Github
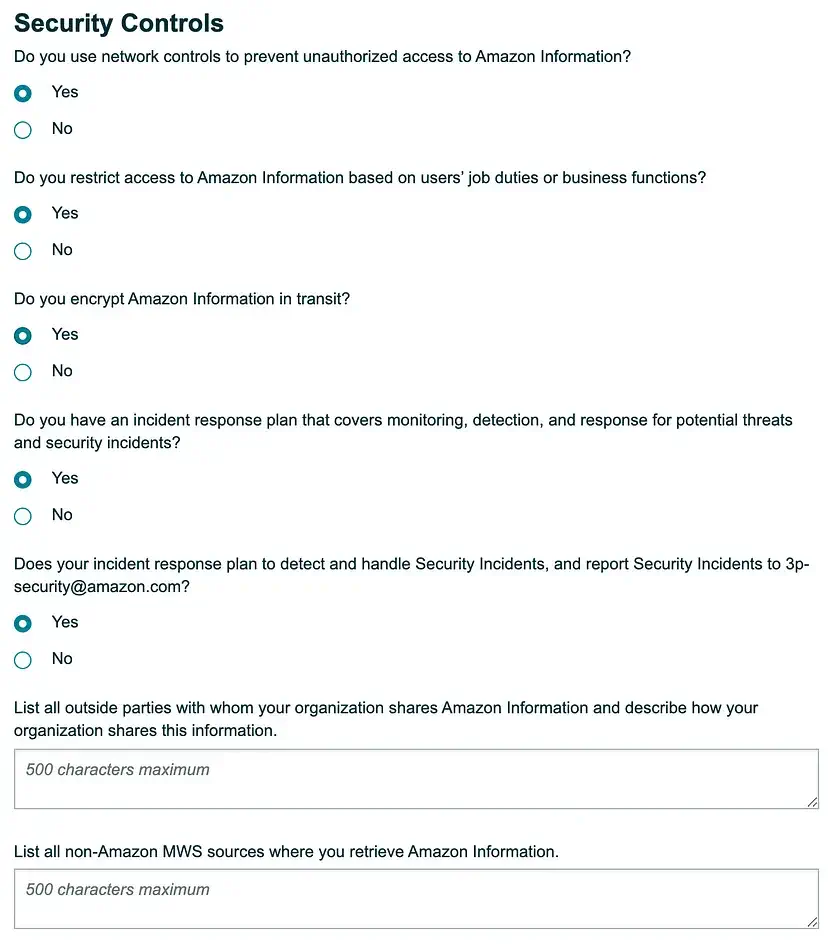
As a last step for registration, we have to confirm security control. This will help us in securing data in transit.
Based on these detail, Amazon will approve the developer account and then we can proceed with further process.
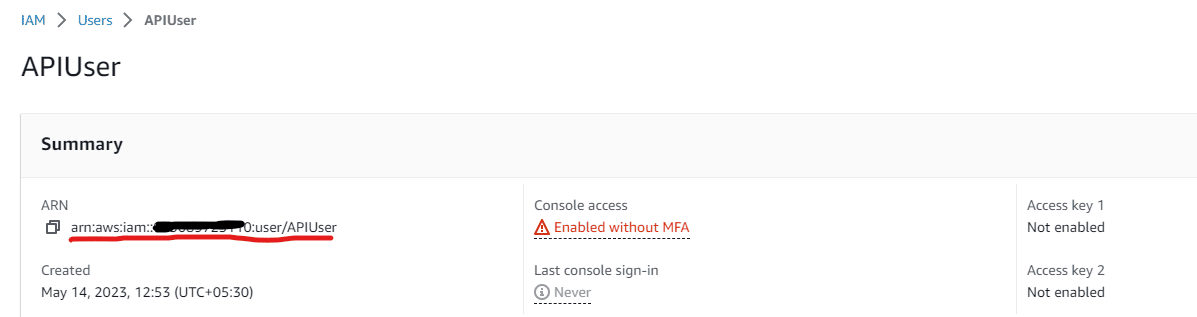
2. Create a User in Amazon IAM
We can access SP-API using users and roles. Role Based authentication is useful when we want to distribute our app to the world and want better control over permissions. User Based authentication is useful when we want to develop the app for our use only. It is important to choose which kind of authentication we need, based on this only we will create an application. While creating an application we have to use user/role’s generated Amazon Resource Names (ARN). For this post, I have selected User Based authentication. So let us create a user using Amazon IAM.
To create a user in IAM, go to the Management Console’s User page. As required, we need Management Console access to perform this step. You can get this permission from Admin or ask them to perform this step.
Open the user creation page from Management Console. User creation page URLs can be different based on the region you are in.
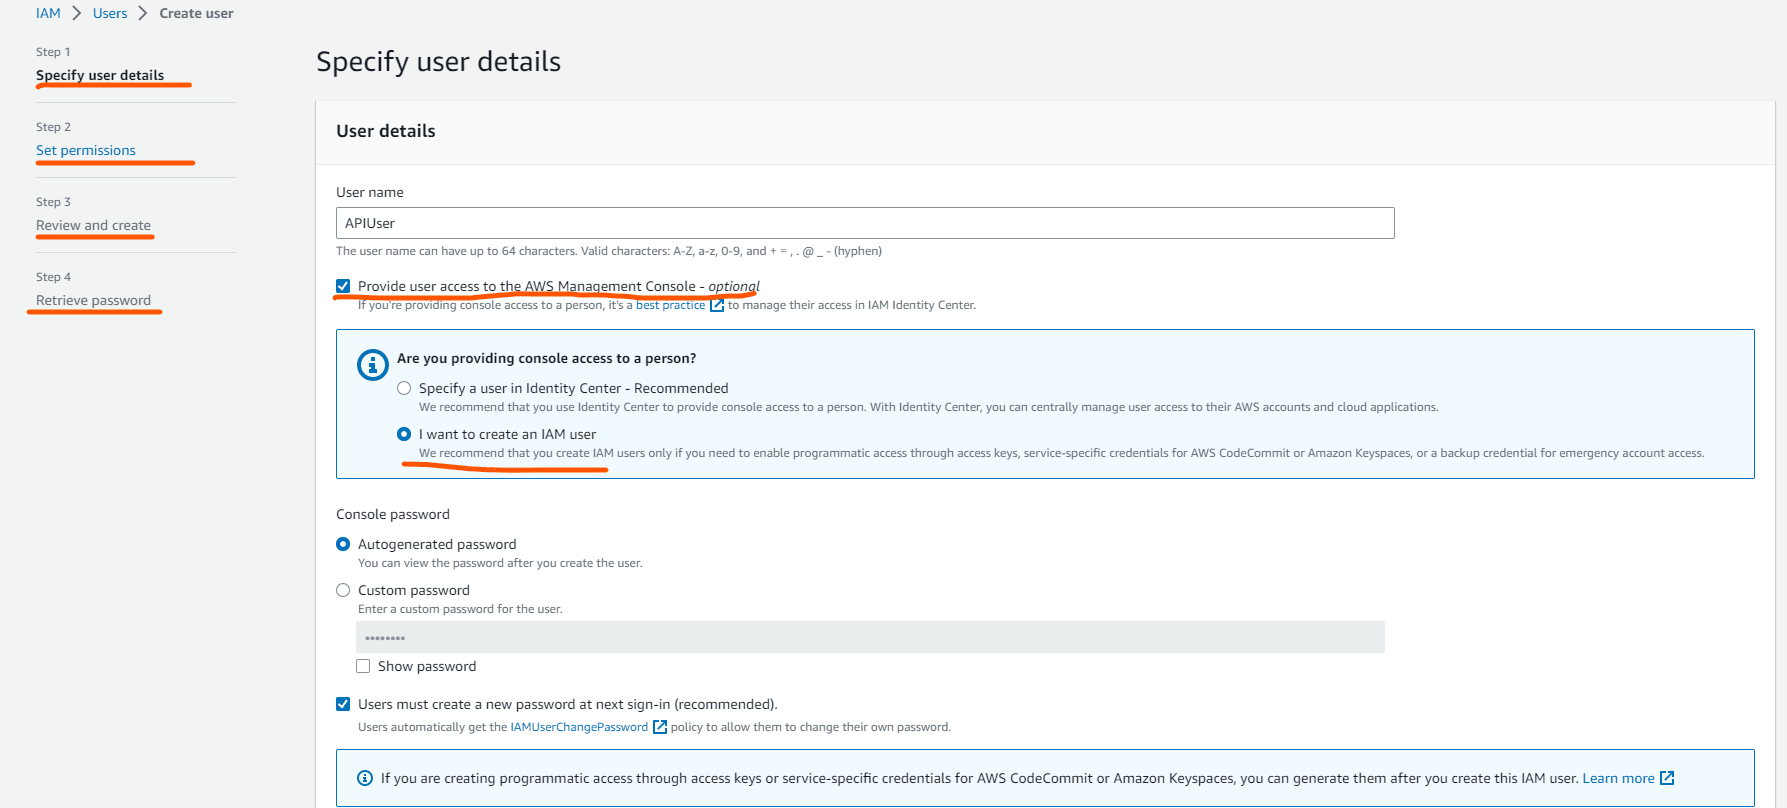
Provide the User name and select the option “Provide user access to the AWS Management Console – optional“ for the user as shown in the above image. For the next 2 pages just move without any changes in pages. It will take the default setting for the user and create a user. In the last step “Retrieve password“, the user’s console URL, user name and password will be shown. Copy this information for later use. You can also download user information by hitting the Download .csv file button.
Once the user is created it will show the user ARN which we will use when the application is created.
User Access Key
Once the user is created, we can create an access key which will be used when accessing data using SP-API. On the user screen, select the Security Credential tab. On this screen, you will get the Access Keys section. Create a new key for API access using a similar to the below page.

It will generate an Access key and a Secret access key. Store both information for later use in the named credential in Salesforce.
3. Create an Inline Policy for Amazon IAM User
We can manage access in AWS by creating policies and attaching them to IAM identities (users, groups of users, or roles) or AWS resources. AWS evaluates these policies when an IAM principal (user or role) makes a request. Permissions in the policies determine whether the request is allowed or denied.
We will create an inline policy for the above-created user.
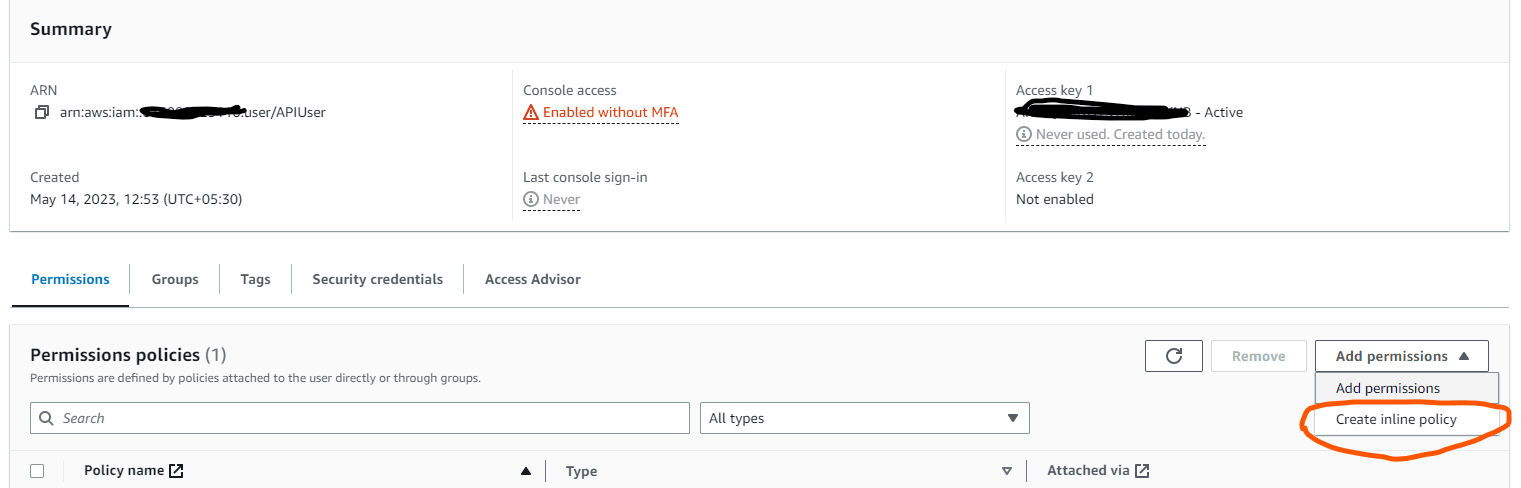
On the policy creation page, select the JSON tab and put below JSON code to create an inline policy.
Review policy and give a proper name for policy creation.
4. Create an Application for external API access
Create an application for external API access from Apps&Services -> Develop app -> Add new application. This is required Admin user access. so if you don’t have admin access, then you can ask to create who has admin access.
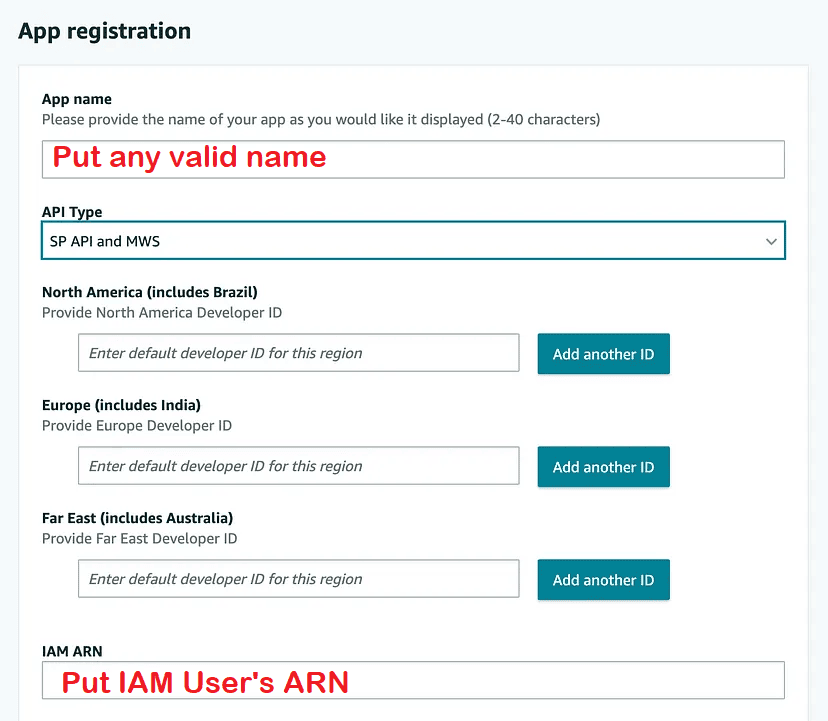
Select SP API and MWS in API Type and put the above-created user’s ARN in the IAM ARN field. Submit for app creation.
5. Generate a Refresh Token for Application
Once the application is created we can create a refresh token for created application. This refresh token will be used to get an access token for API calls.
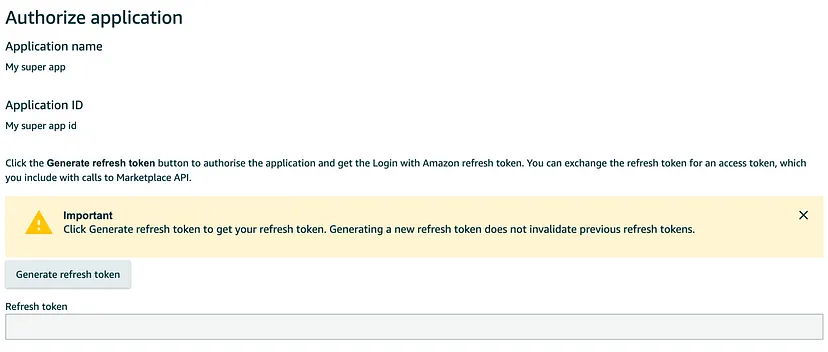
Store generated an access token for later users. We will use this in API calls from Apex.
6. Create Named Credential and External Credential
We are now ready for writing an apex class to call API. We have to call 2 APIs, one for an access token and a second for the actual API call to retrieve order information.
Let us create two external credentials and two named credentials for API calls.
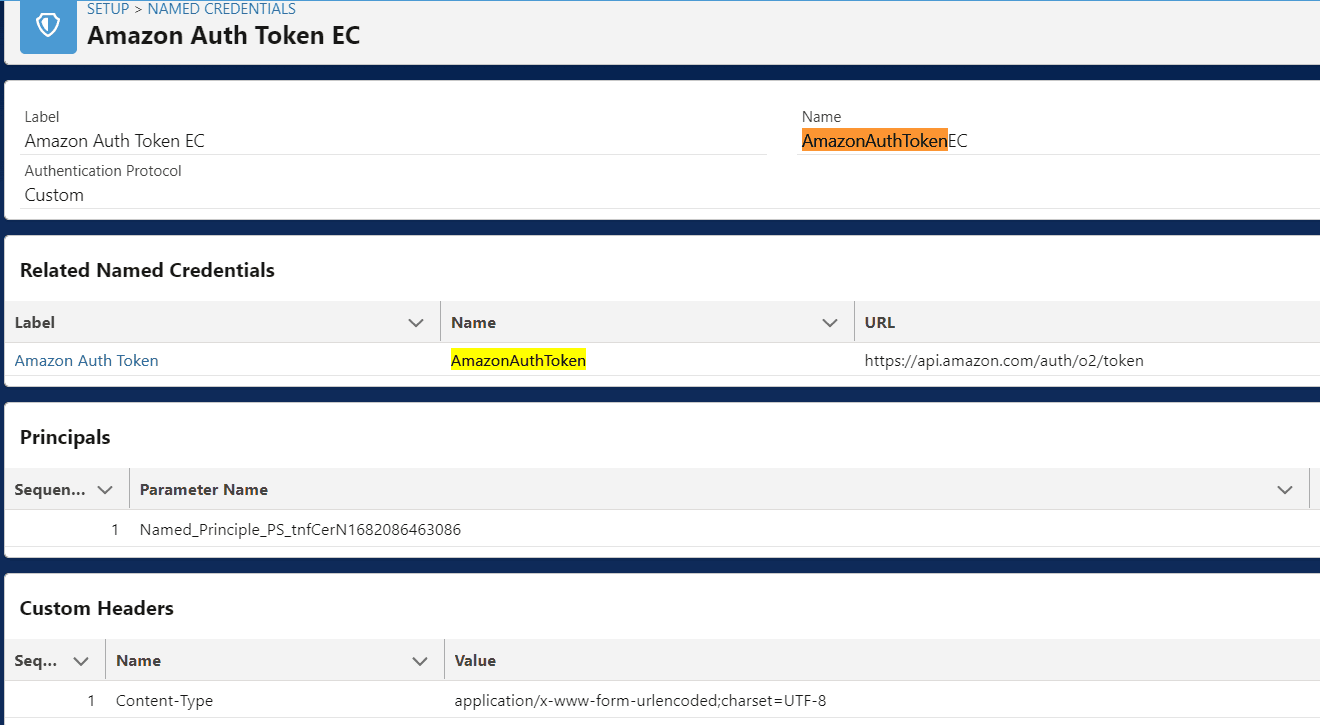
1. External Credential and Named Credential for Auth Token API call
Create an external credential Amazon Auth Token EC with the custom authentication protocol. Create a permission set and assign an external credential. Set content type parameter as application/x-www-form-urlencoded;charset=UTF-8.
Principals
Create a Principal with below detail
- Parameter Name – Named_Principle_PS
- Sequence Number – 1
- Identity Type – Named Principal
Named Credentials
Create a named credential for this external credential. Here are details for creating named credentials for auth token API calls.
- Label – Amazon Auth Token
- Name – AmazonAuthToken
- URL – https://api.amazon.com/auth/o2/token
- External Credential-Amazon Auth Token EC
- Generate Authorization Header – selected
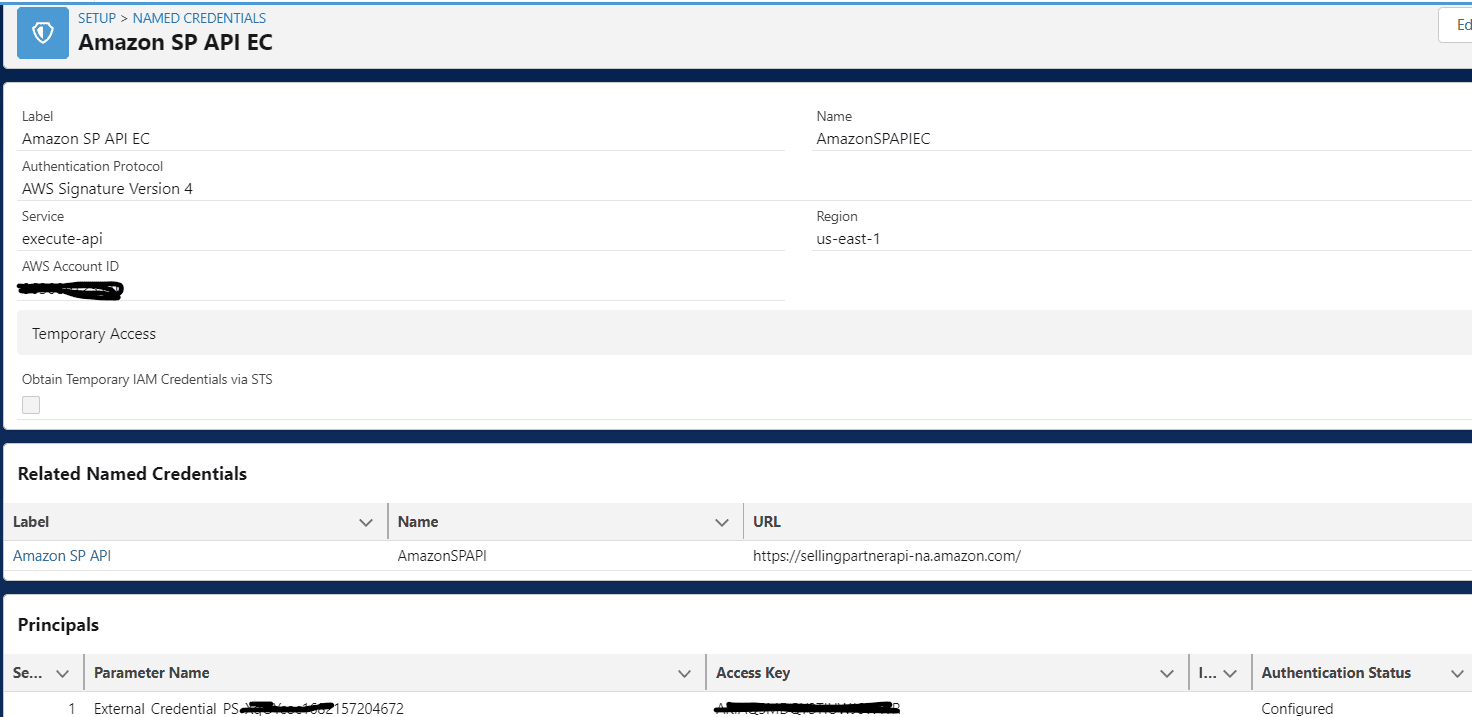
2. External Credential and Named Credential for Order API Call
Create another external credential for the Order SP-API call. It will be of AWS Signature Version 4 authentication type. Detail about External Credential are here
- Name – Amazon SP API EC (AmazonSPAPIEC)
- Authentication Protocol – AWS Signature Version 4
- Service – execute-api
- Region – us-east-1
- AWS Account ID -*************** (Put your account ID. You can get it from the top right corner of the page)
Principals
Create a Principal with below detail
- Parameter Name – External Credential PS
- Sequence Number – 1
- Access Key – Amazon IAM user access key
- Access Secret – Amazon IAM user secret access key
Named Credentials
Create a named credential for this external credential. Here are details for creating named credentials for order API calls.
- Label -Amazon SP API
- Name – AmazonSPAPI
- URL – https://sellingpartnerapi-na.amazon.com/
- External Credential- Amazon SP API EC
- Generate Authorization Header – selected
7. Create a custom object to put order detail
Create a custom object for storing order detail. These orders will be synced from Amazon Seller API. We can create an object with the name – External Order Sync. Below fields need to be created within this object.
| Field Label | Field API | Type |
|---|---|---|
| Customer Email | CustomerEmail__c | |
| External Id | ExternalId__c | Text(255) (External ID) |
| Marketplace Id | MarketplaceId__c | Text(255) |
| Order Date | OrderDate__c | Date/Time |
| Order Status | OrderStatus__c | Picklist |
| Order Total | OrderTotal__c | Currency(16, 2) |
| Sync Completed? | SyncCompleted__c | Checkbox |
8. Create a Batch Class to sync records
Create a batch class that will run at a specific time frame. We can choose night time around 1 PM when the system is not used by business users. This way it will not impact any running process as well.
Apex class details that are used to create a batch class
- AWSSellerBatchService – Batch class to sync records using an API call. If the number of records is higher then we need to call API once again with the NextToken parameter. This will keep calling API till nextToken is null. A few parameters are mandatory like CreatedAfter, and MarketplaceIds for order API calls.
- AWSSellerBatchResponseHandler – This class will handle the Order API response and insert a record in a new custom object. I have stored data in the fields that I have mentioned in the above step.
- AWSSellerService – Apex class to get access token from Amazon Seller API.
- AWSToken – A wrapper class for the Access token response object.
- SPOrderWrapper – A wrapper class for the Order response data.
- MetadataHelper – This is a helper class to get metadata information.
- ExternalCallout – Apex helper class to call external API. You can refer to the blog Generic Apex class for Calling External System for complete detail about this class.
I have also used the metadata setting ExternalAPISetting__mdt for storing other required information for API calls like MarketPlaceId. You can create fields and use in code as per your requirement.
References for Salesforce and Amazon Seller Integration
Selling Partner API Developer Guide
Policies and permissions in IAM
Related Posts
Use Named Credential to Upload File in S3
Named Entity Recognition using Salesforce Einstein API
2 Comments
Great coding, thank you :). Is ExternalCallout class missing here?
Hello Ceylan, It is available in post Generic Apex class for Calling External System
Thank You,
Dhanik